
No products in the cart.


Jinlong
Why Your PET Film Prints Look Blurry and How to Fix Them Fast
Understanding Blurriness in PET Film Printing
Blurriness in PET film printing can take several forms, each affecting your DTF transfers differently. Common types include:
- Pixelation: Blocky, jagged edges often caused by low-resolution artwork.
- Fuzziness or Graininess: Soft, unclear details that make prints look out of focus.
- Smudging or Watery Appearance: Ink bleeding or spreading, creating a wet, blurry look.
Why does this matter in DTF printing? Blurry PET film prints directly reduce the sharpness of your final fabric transfers. This impacts color vibrancy and overall print clarity, which can lead to lower customer satisfaction and repeat business issues.
To quickly check your print quality, examine a recent PET film:
- Is it blurry on the on-screen preview before printing?
- Does the print look unclear immediately after printing on the film?
- Or does the blurriness appear only after powdering and heat pressing?
Identifying when and where the blurriness occurs is key to troubleshooting and fixing PET film blurry prints efficiently.
Most Common Causes of Blurry PET Film Prints
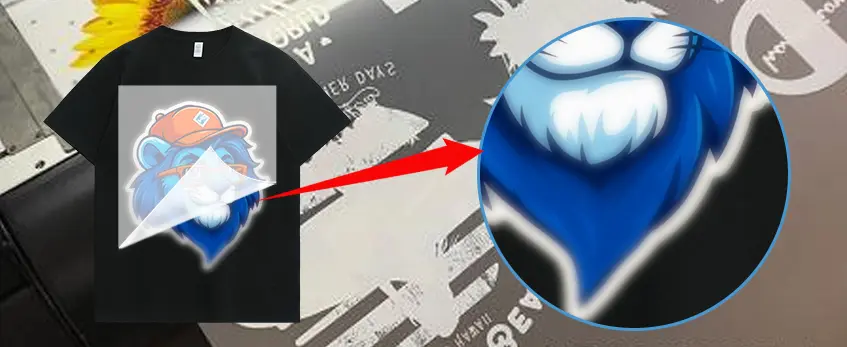
Blurry PET film prints often come down to a few key issues. The biggest culprit is usually low-resolution or improperly prepared artwork—if your design isn’t at least 300 DPI or set up correctly, the print will lose sharpness and look pixelated or fuzzy.
Printer settings also play a huge role. Mismatches in ink density, RIP software profiles, or choosing the wrong media type can cause colors to bleed or details to blur. Sometimes the DTF printer settings for sharp prints are off, making the final output fuzzy or watery.
Printhead problems are another common cause. Clogs, especially in the white ink channel, misalignment, or poor maintenance lead to streaks or blurred edges. Regular cleaning and checks can prevent these issues—refer to guides like DTF printer head problems and how to fix them for detailed help.
Environmental factors can\’t be ignored either. High humidity slows drying time, causing inks to bleed and smudge on PET film. Keeping your workspace controlled helps prevent this.
Lastly, substandard materials like low-quality inks or incompatible, poorly coated PET film cause poor ink absorption and blurry prints. Over- or under-saturation of ink also leads to problems like pooling or diffusion, destroying sharpness.
Using the best PET film for sharp prints and properly matched inks will minimize these issues and improve your DTF transfers dramatically.
Step-by-Step Troubleshooting Guide for Blurry PET Film Printing
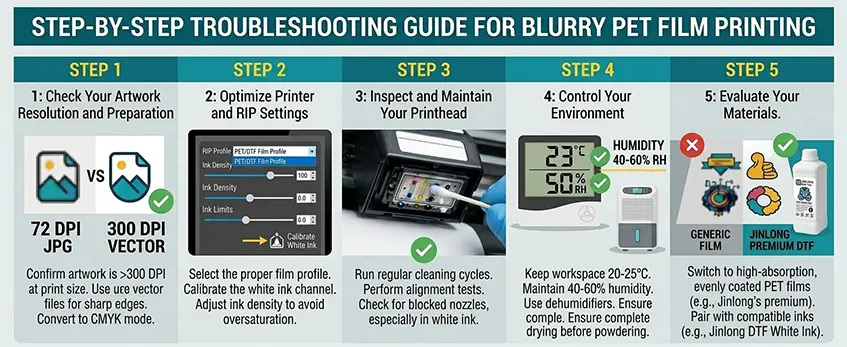
Step 1: Check Your Artwork Resolution and Preparation
Start by confirming your artwork is at least 300 DPI at the print size. Low resolution or pixelated images are a top cause of blurry PET film printing results. Use vector files when possible for sharp edges. Also, convert your design to CMYK color mode to get accurate hues and better print clarity.
Step 2: Optimize Printer and RIP Settings
Make sure your printer and RIP software match your PET film type. Select the proper PET/DTF film profile, adjust ink density and ink limits, and don’t forget to calibrate the white ink channel. These tweaks prevent oversaturation or poor ink adhesion that lead to fuzzy or smudged prints.
Step 3: Inspect and Maintain Your Printhead
Clogs, misalignment, or dirty nozzles—especially in white ink—can cause blurry DTF transfers. Run regular printhead cleaning cycles, check for blocked nozzles, and perform alignment tests to maintain sharp print quality.
Step 4: Control Your Environment
Environmental factors like humidity affect ink drying and bleeding. Keep your workspace temperature between 20-25°C and relative humidity around 40-60%. Use dehumidifiers if needed, and always let prints dry completely before applying powder to avoid a watery blurry PET film look.
Step 5: Evaluate Your Materials
Choosing high-quality materials makes a huge difference. Switch to high-absorption, evenly coated PET films—such as Jinlong’s premium DTF transfer films—which are designed to reduce ink bleeding and enhance detail sharpness. Pair them with compatible inks like Jinlong DTF White Ink for optimal results.
Following these steps helps fix blurry DTF transfers and ensures your prints come out crisp, vibrant, and professional every time.
Advanced Fixes for Persistent Blurriness
If blurriness keeps showing up on your PET film printing despite basic fixes, it’s time to dive deeper. First, fine-tuning your RIP software can make a big difference. Adjust the dot gain control settings to prevent ink from spreading too much on the film, which causes fuzzy or watery blurry PET film prints.
Next, look at your powder application. Uneven or over-shaking the powder can lead to grainy DTF prints or areas that look smudged once heated. Try varying the amount and method of powdering until you find the sweet spot that gives smooth, sharp details without excess residue.
Finally, upgrading your materials can provide a lasting fix. Switching to consistent, high-spec supplies, like the jinlong DTF PET films designed for sharp detail and fast ink absorption, helps prevent ink bleeding and blurriness. These premium PET films plus compatible inks ensure every print comes out crisp and vibrant for professional-grade DTF printing.
Taking these advanced steps will help you fix blurry DTF transfers and maintain sharp, clear results every time.
Prevention Tips for Sharp, Professional Results Every Time
To avoid blurry PET film printing and get consistently sharp DTF transfers, start by building a solid pre-print checklist. This should include verifying your artwork resolution (ideally 300 DPI or higher), double-checking your printer and RIP settings for the right PET film profile, and ensuring your environment is stable—keep humidity between 40-60% and workspace temperature around 20-25°C.
Always run test prints on small sections before full runs. This helps catch any issues early, whether it’s pixelated DTF prints or ink bleeding on your PET film. Regular printer maintenance, especially printhead cleaning and alignment, is key to preventing fuzziness and smudging caused by clogged nozzles.
Finally, source only reliable PET film and inks. Using high-quality products like jinlong DTF’s premium PET films can drastically reduce problems from substandard materials. For best results, choosing well-coated films designed for sharp details and fast ink absorption plays a major role in eliminating blurry or grainy DTF prints. Check out our guide on the best hot peel DTF film roll for fast and efficient production to find compatible materials that support sharp, vibrant prints every time.


 English
 Español
 Deutsch
 Français