

DTF Temperature and Curing Guide for Strong Adhesion and Durability
Understanding DTF Curing and Adhesion Basics
DTF curing is the process of melting the hot-melt adhesive powder into a glue-like state that firmly bonds the printed film to the fabric or substrate. This step is crucial because it transforms the dry powder into a sticky layer ready for transfer, ensuring a strong and lasting adhesion.
The science behind heat and adhesion involves the thermal activation of TPU (thermoplastic polyurethane) powder. When heated, the powder melts and forms microscopic bridges that penetrate the fabric fibers under pressure. This creates a solid bond that holds the print securely, even after multiple washes.
However, successful adhesion depends on more than just temperature. The quality of the adhesive powder, the ink formulation, the film type (whether hot peel or cold peel), and environmental factors like humidity all influence the final result.
Adhesion problems often come from improper heating. If the temperature is too low, the adhesive powder doesn’t fully melt, causing weak bonds that can peel or lift. On the other hand, excessive heat risks damaging the fabric or breaking down the adhesive, leading to discoloration, brittleness, or print failure.
Optimal DTF Curing and Heat Press Temperatures
For most DTF applications, the ideal curing temperature falls between 300–325°F (149–163°C). This range ensures the hot-melt adhesive powder fully melts and bonds properly without damaging the substrate. When curing the printed film before transfer, ovens or presses are typically set within this temperature window to activate the adhesive powder effectively.
During the heat press transfer step, balancing temperature, time (usually 10–15 seconds), and pressure is critical. Too low a temperature or insufficient time can cause poor powder melt and weak adhesion; too much heat or pressure risks scorching or print damage.
The type of transfer film—Peeling à chaud vs. peeling à froid—also influences your temperature setting. Hot peel films require peeling immediately after pressing while still warm, while cold peel films need cooling, often resulting in slightly different optimal curing profiles.
For best results with jinlong DTF products, follow their recommended temperature guidelines closely. Their inks, powders, and films are formulated to work well within these ranges, ensuring consistent powder melting and strong adhesion. Explore their Options de film de transfert DTF et DTF ink formulations designed for peak heat press compatibility and performance.
How Heat Affects Adhesion: The Good, the Bad, and the Technical
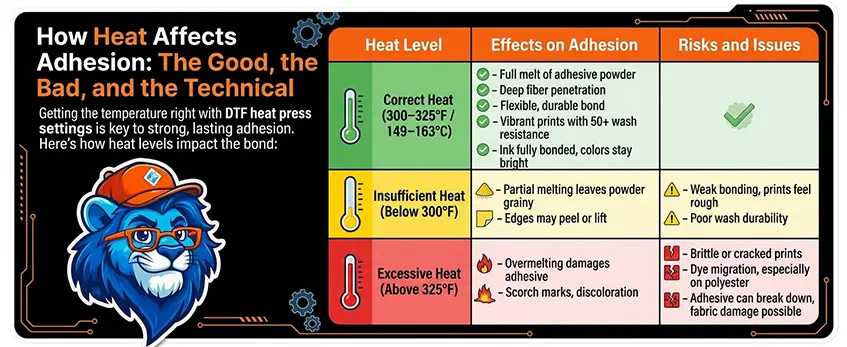
Getting the temperature right with DTF heat press settings is key to strong, lasting adhesion. Here’s how heat levels impact the bond:
| Heat Level | Effects on Adhesion | Risks and Issues |
|---|---|---|
| Correct Heat | – Full melt of adhesive powder | – Deep fiber penetration |
| (300–325°F / 149–163°C) | – Flexible, durable bond | – Vibrant prints with 50+ wash resistance |
| – Ink fully bonded, colors stay bright | ||
| Insufficient Heat | – Partial melting leaves powder grainy | – Edges may peel or lift |
| (Below 300°F) | – Weak bonding, prints feel rough | – Poor wash durability |
| Excessive Heat | – Overmelting damages adhesive | – Scorch marks, discoloration |
| (Above 325°F) | – Brittle or cracked prints | – Dye migration, especially on polyester |
| – Adhesive can break down, fabric damage possible |
Heat, Pressure, and Time: The Perfect Trio
Heat alone won’t cut it. The best DTF curing temperature pairs with:
- Right Pressure: Enough to push melted powder deep into fibers but not so much that it squeezes out adhesive.
- Proper Time: Usually 10-15 seconds, enough for full melt without overheating.
These three variables work together to make sure the powder fully activates and bonds without overdoing it. This balance prevents peeling or cracking and improves wash resistance.
For stable results, consider using trusted equipment like the Imprimantes numériques Jinlong DTF that offer precision controls optimized for these settings.
Fabric-Specific Temperature and Curing Guidelines
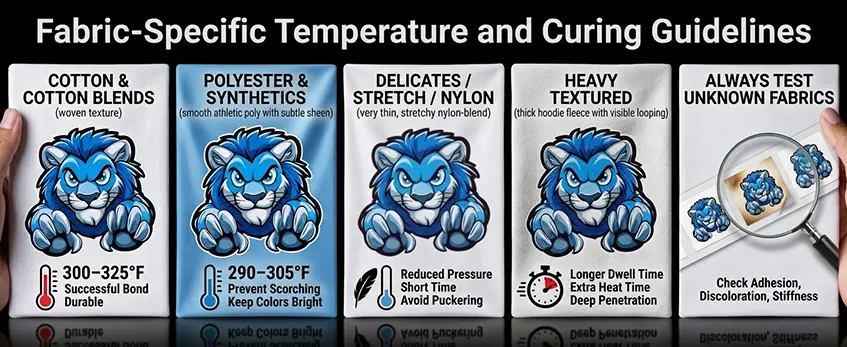
Different fabrics handle heat and curing differently in DTF printing, so adjusting your settings is key for strong adhesion and no damage.
Coton et mélanges de coton : These handle higher temperatures well, usually the standard 300–325°F (149–163°C) range works just fine. They’re forgiving, and the adhesive powder melts properly to give a durable bond.
Polyester et matières synthétiques : Use lower temperatures to avoid scorching or dye sublimation. Settings around 290–305°F (144–152°C) often prevent fabric damage and keep colors bright without bleeding.
Blends, Nylon, Stretch, and Delicate Fabrics: These need careful calibration. Lower temps, lighter pressure, and shorter pressing times help avoid puckering or warping. Always run tests on scraps before full production to dial in perfect settings.
Heavy or Textured Materials (Hoodies, Canvas): These thicker garments might require longer dwell times or pre-pressing to remove moisture and wrinkles. Extra heat time ensures deep powder melt and better fiber penetration for lasting adhesion.
Testing Unknown Fabrics: Always do a small test transfer. Check for peeling, discoloration, or stiffness after curing. Adjust temperature, pressure, and time in small steps to find the sweet spot without risking the garment.
Fine-tuning fabric-specific temperature and curing helps maximize durability, color retention, and overall print quality. For more details on selecting the right powder and ink for your fabric type, check out our TPU powder explained guide and our comprehensive DTF kit overview for workflow tips.
Common Temperature-Related Problems and Troubleshooting
Temperature plays a huge role in DTF transfer adhesion, and getting it wrong can cause plenty of issues. Here’s a quick rundown of common problems and how to fix them:
Peeling or Poor Adhesion
Les causes :
- Heat press temperature too low
- Press time too short
- Insufficient pressure during transfer
- Low-quality adhesive powder or wrong film type
Corrections :
- Increase temperature to recommended 300–325°F (149–163°C) range
- Add a few extra seconds to press time (usually 10–15 seconds total)
- Firm up pressure settings without crushing the fabric
- Use high-quality, compatible powders like Jinlong DTF powders for better melt and bonding
Cracking, Bubbling, or Stiff Prints
Symptoms of Over-Curing:
- Prints feel rigid or brittle
- Surface bubbles appear or crack easily
- Ink and adhesive start breaking down
Corrections:
- Lower press temperature or reduce pressing time
- Avoid excessive pressure which can damage fibers
- Test on scrap fabric to dial in ideal heat press settings
Scorch Marks or Discoloration
Prevention Tips:
- Use protective cover sheets to prevent direct heat damage
- Avoid setting heat too high, especially on polyester or blends prone to dye migration
- Pre-press the fabric to remove moisture that can cause scorching
Recovery:
- Minor scorch can sometimes be lightened by gentle washing or ironing with a cloth barrier
- Severe damage often requires reprinting or switching to a lower temp transfer method
Inconsistent Results Across Presses or Batches
Causes courantes :
- Uneven heat distribution in older or uncalibrated heat presses
- Differences in room temperature or humidity affecting adhesive curing
- Variations in tape or powder application
Corrections :
- Regularly calibrate heat press temperature with an accurate infrared thermometer
- Preheat the press before starting transfers and keep room conditions stable
- Standardize powder and film usage with consistent workflows like those outlined in how to DTF at home or in a small workshop
Real-World Example
One small shop struggled with edge peeling and fading after a few washes. After testing, they found their press was running 10°F cooler than the set temperature. Increasing their heat press by just 10 degrees and holding it for an extra 5 seconds eliminated the issue and improved durability dramatically.
By sticking to recommended temperature ranges and troubleshooting issues methodically, you’ll get consistent, long-lasting adhesion that holds up wash after wash.
Best Practices for Consistent DTF Temperature and Curing
To get reliable results with DTF heat press settings, consistent temperature and curing are key. Here’s how to nail it every time:
Equipment Calibration
- Use accurate thermometers to monitor your DTF curing temperature precisely.
- Ensure your heat press delivers even heat distribution—cold spots mean uneven curing.
- Keep your press clean and well-maintained to avoid pressure inconsistencies.
Step-by-Step Curing Workflow
- Apply the adhesive powder evenly before curing.
- Melt the powder completely using an oven or pre-press at the right temperature to activate the glue-like bond.
- Transfer press with correct temperature, time (usually 10–15 seconds), and pressure.
- Cool and peel according to your film type (hot peel or cold peel) to lock in adhesion properly.
Environmental Controls
- Stable workshop temperature and humidity play a big role—high humidity can weaken adhesive activation.
- Aim for a dry, controlled environment to maintain consistent DTF powder curing and print quality.
Testing Methodology
- Test on scrap fabric to dial in exact temperature and pressing time for each job.
- Make small, incremental adjustments rather than big leaps.
- Wash tests help confirm durability and adhesion strength before full production.
Jinlong DTF Product Advantages
- Jinlong DTF powders and films are formulated to work in a wide temperature range, providing reliable bonding even if your setup varies slightly.
- For best results, try their high-quality transfers like those in the Jinlong DTF Transfer Film Double Basic Series which pair well with their optimized curing guidelines.
Following these best practices ensures your DTF prints stick well, last long, and look vibrant through washes and wear.
Advanced Tips for Professional DTF Results
When aiming for top-notch DTF prints, balancing production speed and quality is key. Using low-temp powders and compatible films speeds up your workflow without sacrificing adhesion or vibrancy—perfect for busy shops needing quick turnarounds.
To boost durability, consider multi-pass pressing to ensure full adhesive melt and fiber penetration. Adding cover sheets during pressing protects designs from scorching and helps maintain print flexibility. Post-press, follow clear washing instructions to keep prints looking fresh through 50+ wash cycles.
Scaling your business? Batch curing needs careful temperature and pressure consistency. Set up quality control checkpoints to catch variations early, maintaining uniform adhesion and color across large orders.
Looking ahead, the industry is shifting toward low-heat adhesives that work well on heat-sensitive fabrics like nylon or stretch blends. These innovations reduce scorching risks and broaden your fabric options, making your DTF transfers even more versatile.
For detailed workflows and product tips, explore how a 13-inch DTF printer delivers high-quality apparel transfers to optimize your setup for professional results.


