

DTF White Ink Settings for Optimal Coverage and Maximum Opacity
Understanding DTF White Ink and Why Opacity Matters
DTF white ink plays a crucial role in producing vibrant, professional prints, especially on dark garments. It works as an underbase—a solid white layer printed first to make colors pop and show true opacity on the fabric.
The Science Behind White Ink and Underbase
White ink isn’t just any color; it’s specially formulated to create a dense, opaque base. This underbase blocks the garment’s color, allowing the inks printed on top to appear bright and vivid. Without a strong white underbase, colors on dark fabrics look dull or washed out.
Opacity Differences: Dark vs. Light Garments
| Color de la prenda | Papel de tinta blanca | Opacity Importance |
|---|---|---|
| Tejidos oscuros | Essential underbase | High opacity needed for coverage |
| Tejidos ligeros | Minimal or no underbase | Lower opacity, less critical |
On dark fabrics, insufficient white ink leads to poor coverage, making prints look translucent or “milky.” On lighter garments, white ink is often unnecessary or used sparingly.
Signs of Poor Coverage
- Transparent or faded areas in the print
- Grayish or dull white instead of crisp white
- White edges or halos around designs
- Uneven opacity across the print
These issues hurt the final appearance and can lead to dissatisfied customers.
Benefits of Optimizing White Ink Settings
Tuning your DTF white underbase settings ensures:
- Consistent coverage on dark textiles
- Vibrant, true-to-design colors
- Reduced ink waste and smoother prints
- A balanced hand-feel without stiffness
Optimizing white ink density, choke, and layering can dramatically improve print quality and grow your production efficiency. Getting these settings right is key to delivering professional-grade DTF transfers every time.
Key Factors Affecting White Ink Coverage and Opacity
Getting the best DTF white ink opacity starts with understanding what impacts coverage. First off, ink quality and formulation are huge. High-grade white inks have better pigment density and flow properties that help create a solid underbase with less transparency. Low-quality inks often lead to milky or thin white layers that weaken adhesion and vibrancy.
Next, your printer hardware matters. Printers with precise nozzle technology and robust white ink circulation systems deliver consistent print density and reduce clogging. This directly affects the opacity and evenness of your white layer. Some consumer printers struggle with thick white ink, making calibration critical.
Then there’s the RIP software’s role. Your RIP controls white ink layering, ink limits, and choke settings — all key to avoiding white edges and achieving smooth underbases. Configuring the software properly helps balance ink density without overloading the film or causing print flaws. If your RIP doesn\’t allow fine-tuning of white layers, coverage will suffer.
Finally, don’t overlook environmental and fabric variables. Temperature and humidity can change ink drying times and flow. Meanwhile, fabric type and color impact how the white ink interacts during transfer—dark fabrics demand heavier white underbases, while lighter ones need less.
For DTF users aiming to dial in perfect opacity with custom white ink settings, these factors combine to make or break print quality. Pay attention to ink formulation, printer capabilities, RIP configuration, and your working environment for the best results.
You can also check out detailed tips on equipment and software optimization in this digital DTF equipment guide to improve your white ink performance.
Recommended DTF White Ink Settings for Optimal Results

Getting the best coverage and opacity in DTF printing starts with fine-tuning your white underbase settings. Here are some practical tips to optimize your DTF white ink for sharp, vibrant prints:
Baseline underbase density: Set your white ink opacity to around 70-85% initially. This range balances strong coverage without wasting ink or causing prints to feel too thick.
Maximum white ink percentage: Most RIP software limits white ink output between 90-100%. Avoid maxing out to 100% constantly, as it can clog nozzles. Instead, adjust gradually based on garment darkness.
Resolution and quality modes: Use at least 720 dpi for smooth edges and crisp details. Higher resolutions like 1440 dpi help on fine lines but increase ink use and print time.
Choke and spread adjustments: Slightly choke the white underbase (1-2%) to prevent white halos around designs, especially on dark fabrics. Spread settings help expand white edges where needed to reduce gaps.
Highlight and white overprint: Layer a lighter white \”highlight\” over the underbase in delicate areas to boost opacity without over-saturating thick sections. This technique sharpens edges and improves vibrancy.
Jinlong DTF-specific tips: Jinlong printers perform best using their proprietary RIP settings optimized for white ink layering and density. Refer to the Jinlong digital DTF workflow guide for recommended underbase choke and ink percentage values tailored to their machines.
By dialing in these settings, you’ll improve DTF print coverage on dark fabrics and achieve consistent white ink opacity that makes colors pop while maintaining a soft hand-feel.
Step-by-Step Guide to Calibrating and Adjusting White Ink Settings
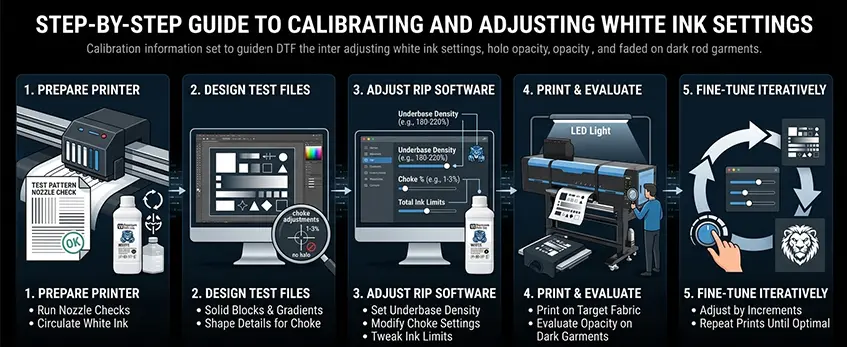
Getting the best white ink coverage starts with a solid calibration routine. Here’s how to dial in your DTF white ink settings for maximum opacity and smooth prints.
1. Prepare Your Printer
- Comprobación de boquillas to ensure every nozzle is firing perfectly. Clogged nozzles reduce white ink density and cause patchy coverage.
- Circulate the white ink regularly before printing to prevent settling and maintain consistent flow. This is crucial for avoiding milky or transparent white layers.
2. Design Test Files for Opacity
- Create simple test prints with solid blocks of white ink, plus gradients to see how coverage changes.
- Include areas with different shapes to test choke adjustments and ensure no white halos appear around details.
3. Adjust RIP Software Parameters
- Set the underbase density: Start around 180-220% ink density for white underbase; adjust higher or lower depending on opacity needs.
- Modify choke settings: A 1-3% choke helps minimize white edges around design elements. This adjustment prevents halos and improves sharpness.
- Tweak white ink limits: Keep total ink limits balanced to avoid clogging and maintain a soft hand-feel.
4. Print Test Runs and Evaluate
- Print your test files on the target fabric (especially on dark garments).
- Assess white ink opacity under different lighting conditions to spot transparency or uneven coverage. Watch for grayish or faded whites indicating low density.
5. Fine-Tune Iteratively
- Adjust density, choke, and layering in small increments based on your observations.
- Repeat test prints until you reach the best balance of opacity, detail, and softness.
With consistent tuning and attention to these settings, you can create professional-quality prints with vibrant, opaque whites. For specific advice on DTF ink formulations and detailed printing tips, check out our guide on DTF ink CMYK and white options. This resource can help you match your RIP configurations to Jinlong’s high-performance DTF inks and ensure smooth printing every time.
Troubleshooting Poor Coverage and Opacity Issues
Dealing with poor coverage and low opacity in your DTF white ink can be frustrating, but most issues have straightforward fixes.
Milky or Transparent White Ink: This usually happens when the white ink density percentage is too low or the underbase isn’t thick enough. Increase the ink density in your RIP software and do multiple white ink passes if possible. Also, check that the ink hasn’t settled or dried out—shake and circulate the ink regularly to keep it ready for printing.
Gray or Faded Prints on Dark Fabrics: Faded whites or grayish tones often point to insufficient white underbase layering or wrong choke settings. Use choke adjustments carefully to overlap the white layer slightly under your color layers. This method will prevent the background fabric from showing through, enhancing opacity.
White Halos (Edge Glowing around Prints): These halos come from poor choke settings where the white ink spreads beyond the intended design edges. Correct the DTF underbase choke adjustment by tightening the white layer under the design. This removes the unwanted white outline and results in cleaner prints.
Uneven Coverage and Printhead Clogging: If your white ink is patchy or inconsistent, nozzle clogs might be the cause. Regular nozzle checks, cleaning protocols, and proper ink circulation prevent clogging issues. Using reputable ink like Jinlong’s DTF ink standard series can also improve flow and reduce clogging problems.
Managing Transfer Thickness and Hand-Feel: If prints feel too thick or stiff, balance your multi-layer underbase passes with thin, even coatings. Excess white ink increases opacity but can affect hand-feel negatively. Finding the sweet spot with your ink limit and layering ensures vibrant coverage without sacrificing comfort.
For detailed tips on avoiding printhead issues, check out common DTF printer head problems and solutions. Troubleshooting white ink coverage is mostly about tuning your density, choke, and maintenance habits to fit each garment and printer setup precisely.
Advanced Techniques for Maximum Opacity with Soft Hand-Feel
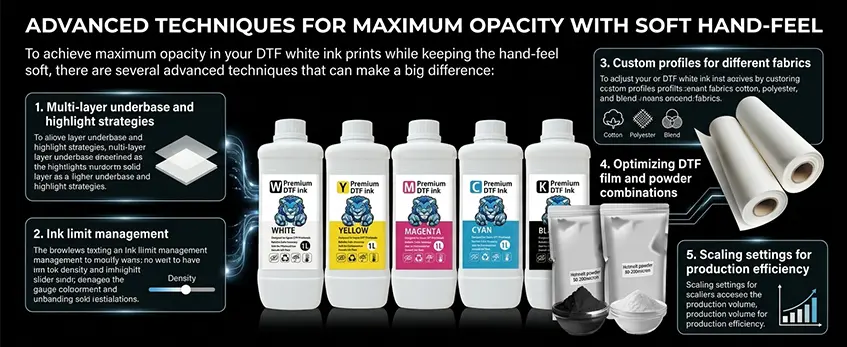
To achieve maximum opacity in your DTF white ink prints while keeping the hand-feel soft, there are several advanced techniques that can make a big difference:
Multi-layer underbase and highlight strategies: Printing multiple white ink layers enhances opacity significantly. Start with a solid underbase layer, then add a highlight layer on top to boost brightness without making the print stiff.
Ink limit management: Balancing the ink limit is key. Too much white ink can cause cracking or stiffness, while too little reduces opacity. Adjust your DTF white ink density percentage carefully to find the sweet spot for both durability and a soft touch.
Custom profiles for different fabrics: Different materials absorb ink differently. Creating or tweaking RIP software white ink configurations for cotton, polyester, or blends helps optimize ink layering and opacity without sacrificing feel.
Optimizing DTF film and powder combinations: The right DTF film paired with quality hot-melt powder plays a crucial role. For instance, using premium powders with highly compatible film (like those from Jinlong Prints’ películas de transferencia DTF estándar) ensures even ink adhesion and vibrant colors with great opacity.
Scaling settings for production efficiency: When moving to larger production runs, fine-tuning your white ink choke settings and layering through RIP presets saves time and maintains consistent opacity across batches.
Mastering these advanced techniques allows printers to get excellent DTF white underbase settings that deliver vibrant, opaque prints on all fabric colors while preserving a soft, comfortable feel that\’s highly valued by customers.
Maintenance and Best Practices to Sustain Great White Ink Performance
Keeping your DTF white ink performing well over time means sticking to some simple maintenance and best practices. Here’s what works best for consistent coverage and opacity:
Routine Ink Circulation and Shaking: White ink tends to settle quickly because of the pigments. Shake your ink bottles or cartridges regularly and run ink circulation cycles in your printer daily, especially if you don\’t print continuously. This prevents clogging and maintains ink density.
Proper Ink Storage: Store your white ink in a cool, dark place at stable temperatures. Avoid exposure to direct sunlight or extreme heat to keep the pigments stable and prevent premature thickening or separation.
Long-Term Printer Care: Avoid letting your printer sit idle for extended periods with ink inside. Perform nozzle checks and cleanings frequently to prevent clogs. Scheduled maintenance will extend printer life and keep your DTF white underbase settings consistent.
Tracking Ink Consumption and Cost: Monitor how much white ink you use per job since it’s typically the most expensive part of a DTF print. Optimizing your white ink density percentage and RIP software settings to balance opacity and ink use saves money without sacrificing quality.
Following these steps will help you maintain the best DTF white ink coverage and opacity while minimizing downtime and unexpected print issues. For detailed tips on getting the best out of your hardware and ink compatibility, check out our comprehensive DTF printers features and performance comparison.


