

DTF Kit for Beginners Complete Guide to Start DTF Printing Easily
What Is DTF Printing and Why Choose It as a Beginner?
Direct to Film (DTF) printing is a fresh, versatile way to create custom designs on fabric—perfect for beginners. Here’s the simple DTF printing process:
- Print your design on special DTF film using a printer loaded with CMYK plus white ink.
- Apply hot melt adhesive powder to the wet print.
- Curar el polvo by heating it so it sticks properly.
- Transferencia con prensa térmica the design from film onto your fabric.
Why Choose DTF Over Other Methods?
Let’s compare DTF with DTG, sublimation, and screen printing:
| Característica | Impresión DTF | Impresión DTG | Sublimación | Serigrafía |
|---|---|---|---|---|
| Tipos de tejido | Cotton, poly blends, dark & light fabrics | Best on cotton, light colors | Polyester, light fabrics | Any, but less easy on blends |
| Order size | No minimums | Often requires minimums | Usually bulk orders | Usually bulk orders |
| Intensidad del color | Vibrant, bright | Bien | Very bright | Bien |
| Resistencia al lavado | Excelente | Moderado | Excelente | Excelente |
| Startup cost | Lower barrier to entry | Más alto | Moderado | Más alto |
| Versatilidad | High (varied fabrics & colors) | Moderado | Limited to polyester | Limited by color count |
Beginner Benefits of DTF Printing
- Bajos costes de puesta en marcha mean you don’t need expensive gear to begin.
- Funciona muy bien en cotton/poly blends and both dark and light fabrics.
- Prints deliver vibrant colors that last wash after wash.
- Scales easily: start with small runs, grow as you gain confidence.
- No minimum orders or screens needed, perfect for side hustles or custom gifts.
DTF printing is a fantastic entry point for anyone looking to dive into custom apparel without fuss or heavy investment. You’ll get professional, durable results while learning a process that can expand with your skills and business.
Essential Components of a Complete DTF Kit
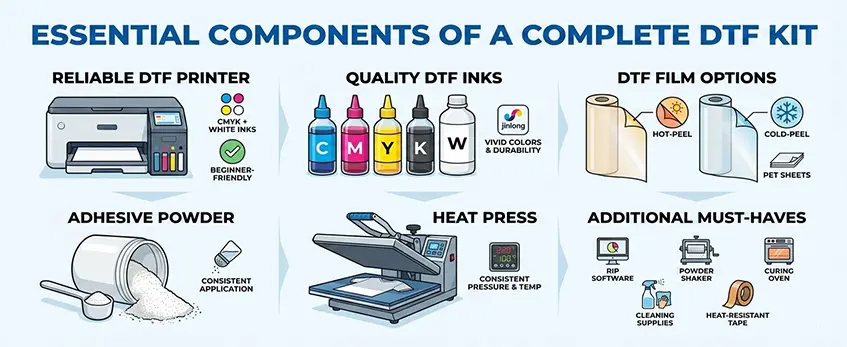
Starting with a reliable Impresora DTF is key—look for beginner-friendly models that handle white ink well, since the white base layer is crucial for vibrant prints on darker fabrics. Your printer should support CMYK + white pigment inks, which must be high-quality to ensure smooth, clog-free printing.
Next, you need the right Tintas DTF. These include CMYK and white pigment inks specifically formulated to provide vivid colors and durability. Poor-quality inks can cause clogging and dull prints, so investing in dependable brands like jinlong DTF inks is a smart move.
The choice of Película DTF matters too. Most kits use PET sheets, and you’ll find options for hot-peel or cold-peel transfers. Hot-peel films release the design while still warm, speeding up production, while cold-peel films require cooling first but can offer more flexibility.
A crucial ingredient is the adhesivo termofusible en polvo. Different powders vary in adhesion strength and curing times. You can apply the powder manually or with automated powder shakers for better consistency. Proper application ensures your print sticks well and lasts through washes.
Don’t skip a reliable prensa de calor. It must deliver consistent, even pressure and precise temperature control to transfer the design properly. Inconsistent pressing leads to poor adhesion or uneven prints.
Additional must-haves include:
- Software RIP for managing print settings and color profiles.
- A powder shaker or applicator to distribute adhesive powder evenly.
- A horno de curado or other alternatives to cure the powder before pressing.
- Cleaning supplies to maintain your printer and prevent clogging.
- Heat-resistant tape to secure film in place without damaging your heat press.
To avoid overspending, start with small quantities tailored for beginners, and buy from trusted suppliers. Jinlong DTF offers curated starter kits and supplies designed to fit beginner budgets and reduce common setup headaches. Check out their complete setup guide for more on choosing the right DTF printer with powder shaker included.
Recommended jinlong DTF Starter Kit Essentials
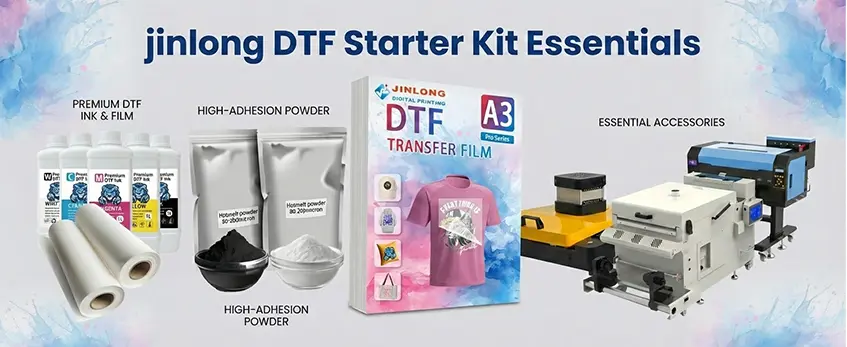
When you’re just starting out with DTF printing, having the right supplies makes all the difference. The jinlong DTF starter kit comes loaded with everything a beginner needs for vibrant, long-lasting results.
- Premium DTF ink set: These inks feature bright, durable pigments made to deliver vivid colors that stand out on both dark and light fabrics. The quality helps avoid common issues like clogging, ensuring smooth operation.
- High-adhesion DTF powder: Jinlong’s hot melt adhesive powder guarantees strong bonding between your print and fabric, reducing the chance of peeling or fading after washes.
- Compatible DTF film rolls and sheets: The PET transfer films included are carefully selected to work seamlessly with jinlong inks and powders, available in both hot-peel and cold-peel varieties. Learn more about film types in this detailed A3 DTF transfer film explainer.
- Bundled accessories: To keep you fully set up, these kits often include powder shakers, cleaning supplies, and heat-resistant tape — tools that make applying and curing your transfers easier.
What sets jinlong DTF apart is consistent product quality and compatibility across every component. That means less hassle, sharper prints, and transfers that hold up wash after wash — essential features for any beginner looking to grow their DTF printing game.
Step-by-Step Guide to Setting Up Your DTF Printing Workspace
Getting your DTF printing workspace ready is key to smooth, high-quality results. Here’s a simple breakdown:
1. Choose and Set Up Your Printer
- Unboxing: Check all parts—printer, power cable, cartridges, manuals.
- Ink Loading: Fill the CMYK and white ink reservoirs carefully, avoid spills.
- Alignment: Run printer head alignment as per instructions to ensure crisp prints.
2. Install and Configure RIP Software
- Install RIP software designed for DTF printing.
- Configure settings for your specific printer model, including ink channels and white ink layers.
- Set up color profiles to get the best vibrant colors and durability.
3. Prepare Your Workspace
- Ventilación: Make sure the area is well-ventilated to handle ink and powder dust.
- Powder Containment: Use a powder shaker or applicator station with an extraction system to avoid powder spreading.
- Organize heat press near the printer for efficiency.
4. Test Print and Maintenance Basics
- Do a test print on DTF film to check for prints clarity and white ink opacity.
- Clean print heads regularly to avoid ink clogs.
- Check powder application consistency and curing process before moving to full jobs.
For more details on setting up a small DTF workshop, explore this comprehensive how to DTF at home or in a small workshop guía.
| Paso | Consejos clave |
|---|---|
| Printer Setup | Follow manufacturer’s manual closely |
| RIP Configuration | Tailor color profiles to your printer |
| Workspace Prep | Good airflow & powder control a must |
| Mantenimiento | Regular cleaning prevents downtime |
Setting up right from the beginning saves headaches and helps you produce prints that stand out.
The DTF Printing Process: From Design to Finished Transfer
Starting your DTF printing journey means understanding each step from design to the final transfer. Here’s a clear breakdown:
Preparación del diseño
Create your artwork in high-resolution formats like PNG or TIFF. Always mirror your design horizontally before printing since the image will be flipped during transfer. Make sure the resolution is at least 300 DPI for crisp details and sharp colors.
Printing on DTF Film
Load your design onto the PET transfer film using a DTF printer. Make sure to print the white ink base layer first, as it helps colors pop on dark or light fabrics alike. Adjust your printer settings for vibrant CMYK colors combined with white ink, ensuring precise layering. For insights on the white ink role, check out this guide on why white inkjet ink is essential for DTF printing.
Applying Hot Melt Powder
After printing, apply the hot melt adhesive powder evenly over the wet ink. This can be done manually with a shaker or automatically with a powder applicator. The powder sticks to the wet ink and helps the design bond firmly with fabric during heat pressing.
Curar el polvo
Next, cure the powder using an oven or a curing station at recommended temperatures (usually around 160–180°C) for 2–5 minutes. This melts the powder and prepares it for transfer. Alternative curing methods can be used but ensure even heat distribution to avoid flaws.
Transferencia a tela
Place the film on your garment and apply heat with a heat press. Typical settings are 320–350°F (160–175°C) with medium to firm pressure for 15–20 seconds. Peel the film hot or cold depending on your film type—hot peel for smooth prints, cold peel for softer finishes. After peeling, consider a post-press with a protective sheet for durability and wash-fast results. For detailed heat press tips, see common heat press mistakes and how to avoid them.
Tips for Common Fabrics
- Cotton Tees: Heat pressing at standard settings works well; hot peel is ideal.
- Hoodies: Use a lower pressure to avoid crushing the fabric; cold peel helps keep softness.
- Bolsos de mano: Fabric type varies, so test peel method and adjust temperature accordingly.
Following these steps carefully makes your DTF printing experience smoother and ensures vibrant, durable transfers every time.
Common Beginner Mistakes and Troubleshooting Tips
Starting with DTF printing can be exciting, but beginners often face challenges like poor adhesion, ink clogs, powder residue on transfers, cracking after washes, and unexpected color shifts. Here’s how to avoid and fix these common issues:
- Mala adherencia: Make sure you’re using the right amount of hot melt adhesive powder and applying even heat/pressure with your heat press. Always follow recommended temperature and time settings for the specific fabric.
- Ink Clogs: Use high-quality DTF inks designed for clog-free performance and clean your printer heads regularly. Avoid leaving ink in the printer unused for long periods.
- Powder Residue: Shake off excess powder before curing. Using a powder shaker or applicator helps evenly coat the printed film and reduces leftover powder on prints.
- Cracking After Washes: Ensure powders are fully cured and press at the proper temperature. Pre-washing fabric can also improve ink bonding.
- Color Shifts: Calibrate your RIP software and maintain consistent printer settings. Using premium inks like jinlong DTF inks helps keep colors vibrant and stable.
Jinlong DTF supplies are designed with beginners in mind, providing consistent quality that reduces common problems. Their ink formulas minimize clogging, and their high-adhesion powders improve durability. For detailed solutions on film issues, check out this guide on common problems with A3 DTF transfer film and how to fix them. Using trusted jinlong DTF products can make your printing experience smoother and more reliable right from the start.
Cost Breakdown: What to Expect for Your First DTF Setup
Starting your DTF printing journey means understanding the costs involved. Entry-level DTF starter kits typically range from $1,000 to $2,500. These kits often include a beginner-friendly DTF printer with white ink, inks, films, powder, and basic accessories. Mid-range setups, which offer faster speeds or larger print sizes, can cost between $3,000 and $6,000 depending on features and brand.
Ongoing supply costs include replenishing DTF inks (CMYK + white), hot melt adhesive powder, and PET transfer films. Expect to spend around $50 to $150 monthly on these, depending on your printing volume. Starter quantities help you avoid overstocking while you get comfortable with the process.
For small runs or side hustles, the ROI is promising due to low minimums, vibrant prints, and versatility (cotton or blends, dark or light fabrics). Investing in quality consumables, such as reliable hot melt polvo adhesivo, can reduce waste and improve print durability, speeding up your path to profit.
Tips for Success and Next Steps
To get vibrant, durable prints with your DTF kit for beginners, focus on a few key best practices:
- Use high-quality jinlong DTF inks and powders to ensure bright colors and wash-fast results.
- Properly calibrate your printer and heat press to get consistent transfers without cracks or fading.
- Keep your workspace clean and well-ventilated to avoid powder clumps and ink clogging.
- Always test print on scrap fabric before running large batches to fine-tune settings.
Regular maintenance routines are essential for keeping your DTF printer and accessories in top shape:
- Clean printheads and nozzles regularly to prevent clogging.
- Store inks and powders properly, away from extreme temperatures.
- Periodically check and adjust heat press pressure and temperature.
When you’re ready to grow your operation, scaling up is easier with jinlong DTF supplies. You can add larger print runs, try different fabric types, or invest in automated powder applicators and curing ovens to boost efficiency without sacrificing quality.
Most important—start small, master the basics with a reliable jinlong DTF starter kit, and build your skills gradually. This low-risk approach helps you learn troubleshooting and produce professional results right from the start.


