

Top Mistakes to Avoid with the Best DTF Heat Press for Perfect Transfers
Using Incorrect Temperature Settings
Setting the right temperature is crucial when using the best DTF heat press. Incorrect temperature leads to poor adhesion, uneven transfers, or damage to the garment. Common DTF heat press mistakes include overheating, which can cause the adhesive powder to burn or become brittle, and underheating, resulting in weak bonding and peeling.
Typical temperature ranges for DTF pressing usually fall between 320°F to 350°F. Going too low causes incomplete curing, while too high risks scorching fabrics, especially sensitive ones like blends or polyester.
How to Fix Temperature Errors:
- Follow Manufacturer Guidelines: Always start with recommended temperatures from both the DTF film and heat press maker.
- Use Test Strips: Run small trial transfers on sample fabrics to dial in the perfect temp before full runs.
- Adjust for Fabric Type: Lower temps for synthetics and blends, higher for cotton heavyweights.
The jinlong DTF heat press offers digital temperature precision, helping avoid common DTF pressing problems caused by guesswork. This feature ensures consistent heat application and improved transfer quality every time.
Applying Wrong or Inconsistent Pressure
One of the most common DTF heat press mistakes is applying the wrong or inconsistent pressure. Too light pressure can lead to uneven DTF adhesion, causing parts of your design to peel or fade quickly. On the flip side, too heavy pressure can damage the garment fabric or squish the design, resulting in a dull, cracked print.
The sweet spot is medium-firm pressure—enough to fully bond the transfer without crushing the fibers. This balance ensures your print stays vibrant and durable without fabric damage.
To get it right every time, use a pressure gauge if your heat press supports one. Testing on scrap fabric before the main run can save headaches and wasted materials. Adjust pressure settings according to the fabric thickness and transfer type to avoid DTF pressing problems.
Getting pressure right is as important as temperature for flawless transfers and long-lasting results. For top-quality DTF transfers, consider pairing your press with premium films like the DTF transfer film 60cm double STD series which work well under optimal pressure settings.
Skipping or Incorrect Pre-Pressing the Garment
One common DTF heat press mistake is skipping or doing an incorrect pre-press on the garment. Skipping this step can leave moisture and wrinkles in place, which leads to uneven DTF adhesion and can cause bubbling or peeling later. Moisture trapped in the fabric interferes with the adhesive powder’s bonding, so it’s crucial to eliminate it before pressing.
Pre-Press Best Practices
- Pre-press the garment for 3-5 seconds at a lower temperature—usually around 280°F (140°C).
- Use medium pressure to smooth out wrinkles without compressing the fabric too much.
- This step helps remove moisture and sets the fabric for better transfer results.
Why It Matters for Cotton and Blends
Cotton and cotton-polyester blends absorb moisture more easily than synthetic fabrics. That makes pre-pressing even more important for these materials to avoid common DTF pressing problems like uneven adhesion or blistering. Proper pre-press ensures the surface is dry and flat, which sets you up for a clean, durable transfer.
For more detailed tips on handling different fabric types and DTF powder use, check out this guide on maximizing the potential of DTF transfer paper and powder in your printing workflow. This can help you avoid early mistakes like skipping pre-press or using wrong temperature settings.
Forgetting or Misusing Protective Sheets
One of the top mistakes when using the best DTF heat press is forgetting or misusing protective sheets. Skipping this step or using the wrong type can lead to serious problems like transfers sticking to the platen, unwanted shine on your prints, or even scorch marks and burns on your garments. Direct contact between the heat platen and your DTF transfer or fabric often causes these issues, compromising your design quality.
When and How to Use Protective Sheets
Protective sheets are essential during every press to create a barrier that prevents direct heat damage. Always place a protective sheet over the transfer before pressing, especially with sensitive fabrics like cotton and blends. Use parchment paper or a Teflon sheet, depending on your heat press manual’s recommendation. This helps maintain clean prints and protects both your garment and the heat press surface.
Replace Worn Protective Sheets Regularly
Protective sheets don’t last forever. Over time, they accumulate ink residue and wear out, reducing their effectiveness and increasing the risk of burns or sticking. Make it a habit to inspect your sheets regularly and replace them when you notice tears, heavy staining, or loss of smoothness. Investing in new sheets keeps your transfers sharp and your pressing consistent.
For best results, always follow manufacturer instructions and consider the guidelines found in resources like the jinlong DTF heat press guide to avoid common DTF pressing problems related to protecting your prints.
Rushing the Peel: Hot Peel vs Cold Peel Timing
One of the most common DTF heat press mistakes is peeling the transfer too soon or waiting too long. Rushing the peel compromises the durability of your design, causing peeling, cracking, or uneven adhesion. If you peel too early while the transfer is still too hot, the design can stretch or stick unevenly. Conversely, waiting too long for a cold peel can make the adhesive set improperly, leading to poor bonding.
For most DTF transfers, hot peel timing is typically around 5 to 10 seconds right after pressing, but this can vary depending on the transfer film and ink used. Always check your manufacturer’s specific guidelines. Some transfers require a cold peel, where you wait for the print to completely cool before removing the carrier sheet. Confirm the peel method per transfer type to avoid premature peeling problems.
Using the right peel timing ensures strong, long-lasting adhesion and avoids common DTF transfer errors. This simple step improves overall transfer quality and can save you from wasted materials and rework. For premium results, consider products like jinlong DTF transfer films that come with clear instructions on peel timing customized for their film and ink combination.
Ignoring Fabric Type and Compatibility
One of the biggest DTF heat press mistakes is overlooking how different fabrics react during pressing. Cotton, polyester, blends, nylon, and textured fabrics all require tailored heat press settings for the best results. Using the same temperature and pressure across these materials often leads to uneven DTF adhesion, scorching, or poor transfer durability.
To avoid this common DTF transfer error, always adjust your heat press temperature and time based on the garment’s fiber content. For example:
- Cotton: Usually needs slightly higher temperatures but shorter press times.
- Polyester: Requires lower heat to prevent melting or shine.
- Blends: Need balanced settings that protect both fibers.
- Nylon and textured fabrics: Often benefit from using a heat press pillow or pad to ensure even pressure on uneven surfaces.
Testing fabric swatches before full production is also critical. This lets you fine-tune your heat press pressure and temperature without wasting materials or risking costly errors.
For more on choosing the right transfer film and settings, consider checking out this helpful DTF transfer film guide to match your fabric type and improve results with the best DTF heat press practices.
Over- or Under-Curing Adhesive Powder Before Pressing
One common DTF heat press mistake is over- or under-curing the adhesive powder before pressing. Too much heat or time can make the adhesive brittle, causing cracks and poor durability in your transfer. On the flip side, under-curing prevents the powder from properly melting and bonding, leading to uneven DTF adhesion or peeling off after washing.
To avoid these DTF curing errors, balance is key. Follow the manufacturer’s recommended curing times and temperatures closely. Typically, pre-curing the adhesive powder at a moderate temp until it looks tacky—not fully melted—works best. This ensures the powder melts fully during pressing without becoming fragile from excess heat.
Pay attention to your timing and heat press settings especially when switching between fabrics or powders. If you want the best results with your DTF projects, using a precision heat press like the jinlong DTF digital printer series helps maintain consistent curing and pressing, reducing common issues that come with poor heat and timing control.
Poor Alignment and Positioning: Avoid Crooked or Shifted Designs
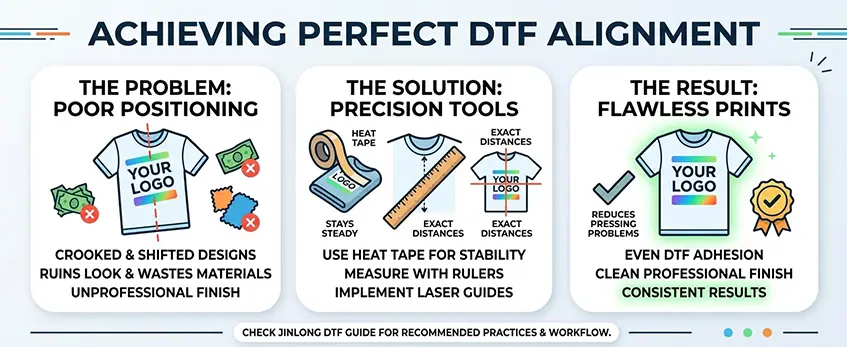
One of the most common DTF heat press mistakes is poor alignment, which leads to crooked or off-center designs. This happens when the transfer isn’t properly placed before pressing, ruining the look and wasting materials. Even a small misalignment can make your print look unprofessional.
To nail the perfect placement every time, use tools like heat tape, rulers, or laser guides. Heat tape holds your transfer steady, while rulers help measure exact distances from edges.
Taking the time to align properly reduces DTF pressing problems and avoids uneven DTF adhesion. For more tips on getting your press settings and workflow right, check out the detailed jinlong DTF heat press guide and recommended practices. This will help you achieve clean, professional results with each press.
Neglecting Post-Press and Cooling
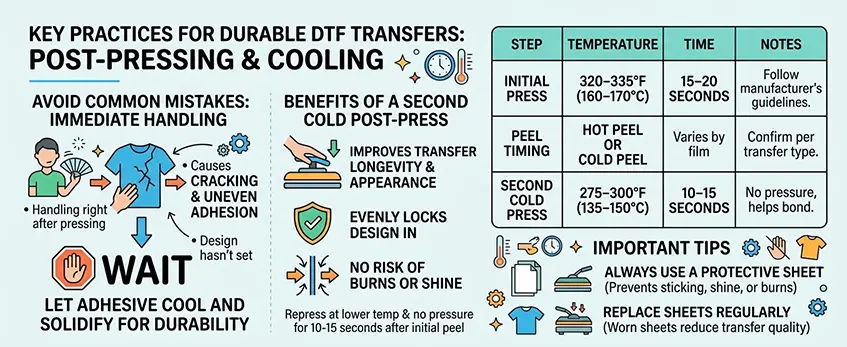
One of the most common DTF heat press mistakes is handling transfers immediately after pressing. Doing this can cause cracking and uneven adhesion because the design hasn’t fully set. A short rest period lets the adhesive cool and solidify, ensuring durability.
Benefits of Second Cold Post-Press
Adding a second cold post-press step improves transfer longevity and appearance. After the initial press and peel, place the garment back under the heat press at a lower temperature and no pressure for about 10–15 seconds. This step evenly locks the design in without risk of burns or shine.
Recommended Timing and Protective Sheet Use
| Step | Temperature | Time | Notes |
|---|---|---|---|
| Initial Press | 320–335°F (160–170°C) | 15–20 seconds | Follow manufacturer’s guidelines |
| Peel Timing | Hot peel or cold peel | Varies by film | Confirm per transfer type |
| Second Cold Press | 275–300°F (135–150°C) | 10–15 seconds | No pressure, helps bond |
Always use a protective sheet during both presses to prevent sticking, shine, or burns. Replace protective sheets regularly as worn sheets can reduce transfer quality.
Proper post-press and cooling are essential to avoid cracking and uneven DTF adhesion, helping you get the most out of your best DTF heat press. For more tips on perfecting your transfers, check out techniques on how to DTF print with white ink for added durability and quality.
Using Low-Quality or Incompatible Transfers/Films
One of the biggest pitfalls in DTF heat press work is using low-quality or incompatible transfer films and inks. No matter how precise your DTF heat press settings are, poor materials can cause uneven adhesion, peeling, and dull prints that wear out quickly. Cheap films often don’t melt or cure well, leading to cracks or fading after just a few washes. This can waste your time, heat presses, and printed designs.
To avoid these common DTF transfer errors, always pair your press with premium films and inks specifically designed for DTF use. High-quality materials ensure better heat and pressure compatibility, resulting in transfers that last longer and look sharper. For example, the DTF Transfer Film 60cm Double Basic Series offers excellent adhesion properties optimized for the best DTF heat press machines like Jinlong’s lineup.
Using the right film and ink combination helps prevent typical DTF pressing problems, such as uneven adhesion or peeling. It’s a small upfront investment that translates to fewer retries, less waste, and more professional results your customers will appreciate.
Always check that your transfers and films match your printer and heat press specifications before starting a batch. This eliminates costly mistakes and ensures your DTF heat press delivers on its full potential every time.


