

How to DTF Transfer Without Cracking Using Jinlong DTF Film and Powder
Phase 1: The Foundation (Materials & Software)
The role of ink and film in DTF transfers is critical. Cheap ink might seem like a cost-saver, but it often leads to brittle prints that crack and peel quickly. High-quality ink paired with a high-absorption PET film like Jinlong DTF Film ensures the ink holds properly without compromising flexibility. This film\’s superior absorption prevents ink pooling and promotes better adhesion.
Next, the secret weapon: DTF powder (TPU adhesive). Choosing the right powder type is vital:
- White powder: Most common for general use.
- Black powder: Ideal for printing on dark fabrics.
- Anti-sublimation powder: Prevents color migration on polyester blends.
For garments that stretch (like spandex or ribbed cuffs), use \”stretchy\” soft-hand powders. These powders provide elasticity to the print, reducing cracking on elastic garments.
Don\’t overlook RIP software settings—this step is crucial for print durability. Use rasterization to add tiny \”breathing holes\” (known as halftones) that allow the print to stretch with the fabric instead of cracking or peeling. Adjust your ink volume carefully; avoid over-saturation, which causes pooling and weak adhesion. Aim for a white underbase coverage between 40-60%, balancing opacity with flexibility.
Getting these foundation elements right—quality ink and film, the right TPU adhesive powder, and optimized RIP software settings—is your first step to flawless DTF transfers that resist cracking and peeling.
DTF Curing Process: How to Cure Without Cracking or Peeling
Getting your DTF transfer to last starts with the right curing process. If you want to avoid cracking or peeling, focus on these steps before you ever touch the heat press.
Proper Powder Application: No Bald Spots, No Peeling
- Shake and tap: Evenly coat your wet print with TPU adhesive powder. Tilt and tap the film so powder covers all the ink—especially the edges. Bald spots lead to easy peeling.
- Don’t overdo it: Too much powder means heavy, stiff prints that are more likely to crack.
Oven Curing Guidelines: DTF Curing Oven Temperature
- Set your oven: 120°C-130°C (about 250°F-265°F) is the sweet spot.
- Time it right: 2-3 minutes is usually enough. Under-cured? The print won’t stick. Over-cured? The adhesive gets brittle.
- Visual cue: Look for the “orange peel” texture on the cured powder—slightly bumpy, not glossy or powdery. That’s your sign it’s ready.
Avoid Common Curing Mistakes
- Under-curing: Adhesive stays powdery, so your transfer peels right off the shirt.
- Over-curing: Adhesive turns yellow and brittle, leading to cracks and poor wash fastness.
- Pro tip: Use high-quality DTF powder like this one made for cotton, polyester, and blends for the best stretch and durability.
Mastering the DTF curing process is key to transfers that hold up to stretching, washing, and daily wear. Get the powder coverage and oven settings right, and you’re halfway to a perfect, crack-free print.
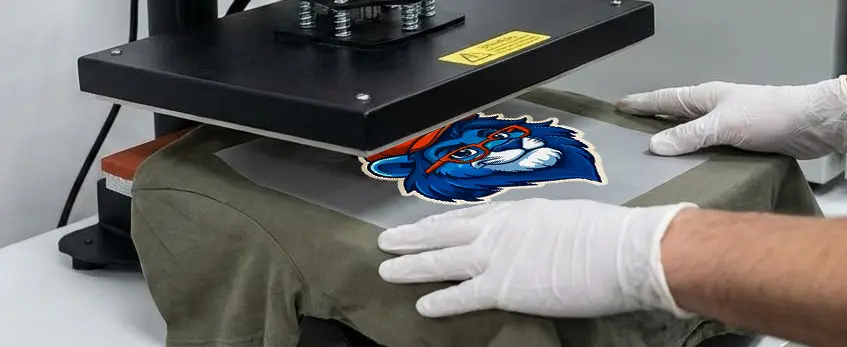
Phase 3: The Heat Press Application (The Critical Moment)
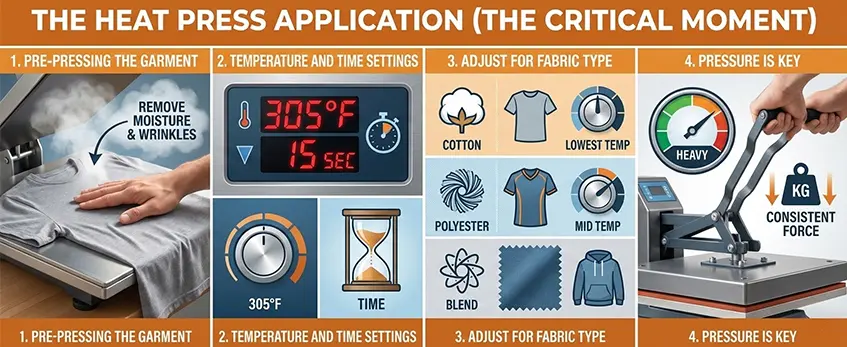
Getting your DTF transfer to last without cracking or peeling comes down to nailing the heat press step. Here’s how I do it for the best results:
Pre-Pressing the Garment
- Always pre-press your shirt for 5-10 seconds. This removes any moisture and flattens the fibers, which helps the transfer stick better and prevents bubbling.
Temperature and Time Settings
- For most jobs, set your heat press between 300°F and 320°F (150°C – 160°C).
- Press for 10-15 seconds. Don’t go overboard—too much time or heat can scorch the film or the fabric.
Adjust for Fabric Type
- Cotton: Stick to the standard settings above.
- Polyester or blends: Drop the temperature a little (closer to 300°F/150°C) and keep the time short. This helps avoid dye migration and keeps the print crisp. If you want a detailed walkthrough on polyester vs. cotton DTF settings, check out this DTF printer setup guide with ink, film, and heat press tips.
Pressure is Key
- Use medium-heavy pressure—about 4-6 bar or 60 PSI. Too light and the adhesive won’t bond; too heavy might flatten the print.
- The goal is to embed the melted TPU adhesive powder into the fabric weave, not just sit on top.
Quick Tips
- Always use a heat press that gives even pressure and accurate temps.
- If you see edges lifting after pressing, bump up the pressure or time a little.
- For more on the differences between DTF and other methods, see this practical guide to DTF vs. vinyl printing.
Dialing in your heat press settings is the heart of how to DTF transfer without cracking or peeling. Get this step right, and your prints will look pro and hold up wash after wash.
Phase 4: The Peel and The Finish
Knowing when and how to peel your DTF transfer is crucial to avoid cracking or peeling later. Cold peel vs. hot peel depends on the type of film you use—make sure to check if your Jinlong DTF film recommends peeling cold or hot. Peeling too early, especially if the transfer hasn’t fully cooled or cured, can cause the edges to lift and ruin your print.
For the best results, peel slowly with a low, steady, continuous motion. Don’t yank or rush it—this helps the adhesive stay firmly embedded in the fabric. If you notice any lifting, pressing again can help. This is where the “second press” comes in: a quick re-press for 5-10 seconds with medium pressure seals the edges and increases durability.
When finishing, use either Teflon sheet or parchment paper as a protective layer before pressing. Teflon usually gives a glossy finish, while parchment paper offers a matte look—choose based on your desired final appearance. This extra press also helps encapsulate ink and TPU adhesive powder, locking everything in place and extending your transfer’s lifespan.
Keeping these steps tight ensures your DTF prints last longer and avoid common issues like peeling or cracking, making your custom apparel look great wash after wash.
For more on perfect DTF finishing techniques, check out our detailed overview of DTF transfer machines and heat press systems.
Phase 5: Washing & Care Instructions for End-Users
To keep your DTF transfers looking great and prevent cracking or peeling, customer care is key. Here’s how to make your prints last longer:
- Wash Inside-Out: Turning garments inside out protects the print from direct friction and wear during washing.
- Use Cold Water Cycles: Hot water can weaken the adhesive bond of the TPU adhesive powder and cause fading or cracking. Cold water preserves the print’s flexibility and durability.
- Avoid High-Heat Drying: Skip high-heat tumble drying. Instead, opt for tumble dry low or better yet, hang dry your clothes. High heat can degrade the DTF ink and cause peeling or brittleness.
Following these simple steps helps maintain the stretchability and wash fastness of your DTF prints while keeping the colors sharp and the surface intact. Proper care means your garments will stay vibrant and crack-free for many washes.
Troubleshooting Quick-Guide
When your DTF transfers show issues like edges lifting, cracking, or ink sticking to the film, here are quick fixes to keep your prints flawless:
Edges Lifting: This usually means the heat press pressure or time wasn’t enough to fully embed the TPU adhesive powder into the fabric. Increase your heat press pressure to medium-heavy (around 4-6 bar or 60 PSI) or extend pressing time slightly. Proper temperature and pressure are key for strong bonding.
Cracking When Stretched: If your print cracks after stretching, check your ink volume—too much ink saturation makes the print brittle. Aim for about 40-60% white underbase coverage and use RIP software to add rasterization with halftones (“breathing holes”) for stretchability. This technique helps the print flex with the fabric.
Ink Remains on Film After Peel: When ink sticks to the PET film during peel, it often means the transfer isn’t fully cooled if you’re doing a cold peel method. Be sure the print has completely cooled before peeling to avoid adhesive failure and lifting edges.
Following these quick tips will help you enhance your direct to film durability, making your prints last longer with no cracking or peeling. For more details about the right film type and avoiding common issues, check out the common problems when printing DTF hoodies and how to fix them guide.


