

Best 24 Inch DTF Printer Setup Guide for Professional Quality Results
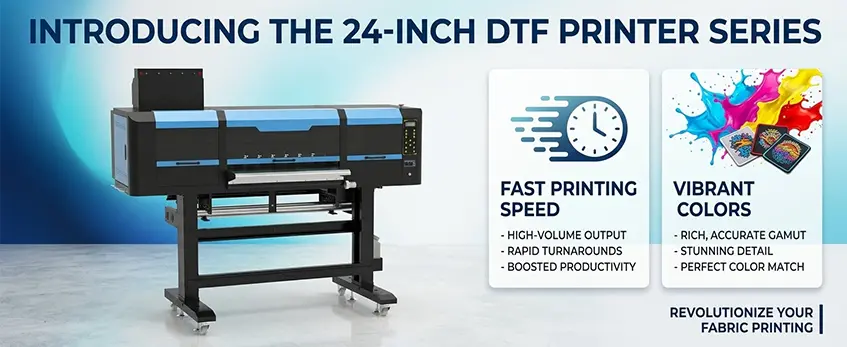
Why Choose a 24-Inch DTF Printer for Professional Work?
A 24-inch DTF printer is the go-to choice for serious professionals. Here’s why:
Benefits Over Smaller Models (A3/A4)
| Fonctionnalité | 24-Inch DTF Printer | A3/A4 DTF Printer |
|---|---|---|
| Higher Throughput | Prints larger jobs faster | Limited for small jobs |
| Réduction des déchets | Efficient gang-printing saves media | More waste per print |
| Larger Designs | Perfect for full-back or oversized prints | Best for small or single designs |
- Faster Production: Large-format printers handle more prints per hour, boosting your efficiency.
- Rentable : Save on material waste with gang printing—costs go down, profits up.
- Flexibilité de la conception : Print larger or multiple designs on one sheet, ideal for apparel businesses.
Perfect for Small-to-Medium Shops
If your shop handles 50 to 500+ prints daily, a 24-inch DTF printer fits seamlessly into your workflow. It’s a reliable workhorse that balances size, speed, and cost.
What to Look for in a 24-Inch DTF Printer
- Tête d'impression : Epson i3200 or similar for crisp, vibrant colors
- White Ink System: Consistent, reliable white ink flow for crisp images
- Qualité de construction : Heavy-duty construction for durability and longevity
- Vitesse : Aim for at least 10–15 sqm/h for professional production
- Voltage Compatibility: Ensure it matches US power standards (110V or 220V)
Choosing the right setup means you’ll get professional results, higher efficiency, and a long-lasting investment.
Top 24-Inch DTF Printer Considerations in 2026
When choosing the best 24 inch DTF printer in 2026, you’ll encounter two main types: dual-head and single-head models. Dual-head printers offer faster throughput and better efficiency for high-volume shops, while single-head printers can be more budget-friendly and simpler to operate for smaller runs. Popular models often include the robust Jinlong DTF series, which stands out with features tailored for professional use.
The Jinlong 24\” DTF printers are particularly favored because of their advanced ink circulation system that helps prevent clogs—a common issue in wide-format DTF printing. This system ensures consistent and vibrant color output, making it easier for pros moving up from smaller A3 or A4 DTF printers to achieve top-quality results without a steep learning curve.
When investing in a 24-inch DTF printer, be sure to factor in your budget alongside warranty and supplier support options. Reliable customer service can save you time and money down the road, especially as you seek to scale your production or troubleshoot technical issues. For a full rundown of professional DTF printer options and market trends, check out the detailed insights from DTF printing in 2026 updated techniques and trends.
Essential Equipment for a Complete Professional Setup
To get professional results with your 24 inch DTF printer, your setup needs more than just the printer itself. Here’s what you’ll want to include:
- 24 inch DTF printer: The centerpiece, like models with Epson i3200 printheads, designed for vibrant, high-throughput printing.
- Automatic powder shaker: Ensures even, consistent powder application to seal your designs properly.
- Curing oven or dryer: This is key for curing the powder on the transfer film before pressing, locking in durability and wash resistance.
- Presse à chaud: Essential for transferring your prints onto garments with the right temperature and pressure.
Recommended Add-Ons for a Better Workspace
- Humidifier or dehumidifier: Maintaining optimal humidity (40–60%) helps prevent issues like white ink clogging or powder adhesion problems.
- Air purifier and proper ventilation: Keep your printing area dust-free and well-ventilated for safer, consistent operation.
Power and Environmental Requirements
- Stable power supply compatible with your printer voltage is a must.
- Keep your workspace temperature between 68–77°F to maintain ink flow and overall print quality.
- Monitor humidity closely—too low or too high can affect ink drying and powder adhesion.
By assembling this essential equipment, you set the stage for consistent, high-quality prints and smoother daily operations. For more insight on film options to pair with your printer setup, check out the Rouleau de film DTF pelable à chaud pour une production rapide et efficace.
Unboxing and Initial Hardware Setup (Jinlong DTF Focus)
Start by carefully unboxing your 24 inch DTF printer, making sure all components are accounted for. Your checklist should include the printer unit, power cables, ink reservoirs, printheads, media rollers, and any included accessories like cleaning kits or user manuals.
Prepare your workspace with a stable, level surface to support the printer’s weight and size. Ensure there’s enough clearance around the printer for smooth media feeding and take-up—this helps avoid jams during printing. A clutter-free area is key for professional results.
Next, connect the power cable to a compatible outlet with proper voltage as specified in the printer manual. When powering on the Jinlong 24 inch DTF printer for the first time, follow the basic control overview to familiarize yourself with buttons, status lights, and touchscreen navigation. This initial setup sets the foundation for consistent, high-quality prints.
For more detailed hardware specs and setup tips, check out the Jinlong DTF printer product pages which cover models ideal for professional wide-format DTF printing.
Ink System Preparation and Filling
When setting up your 24 inch DTF printer, using the right ink types and proper filling order is crucial. Typically, you\’ll work with CMYK plus white ink—always opt for Jinlong-compatible inks to ensure smooth circulation and prevent clogs.
Here’s a straightforward process to prepare your ink system:
- Priming the lines: Before filling, prime the ink lines to remove any air pockets and residual ink from previous usage.
- Filling reservoirs: Carefully fill each ink reservoir with its designated color—Cyan, Magenta, Yellow, Black, and White—making sure not to overfill.
- Activating circulation: Turn on the ink circulation system, especially for white ink, to keep the pigment evenly mixed and prevent settling.
To avoid air bubbles, which can cause printing issues like banding or inconsistent colors, handle ink carefully and run initial cleaning cycles right after filling. These cleaning cycles flush out any trapped air and prepare the printheads for professional-quality output.
Following these steps ensures your 24 inch DTF printer maintains vibrant colors and reliable print performance essential for a professional DTF printing workflow.
For detailed guidance on ink preparation and maintenance, explore the best desktop DTF printer in 2026 reviews and buyers guide.
Loading and Threading DTF Film
Picking the right DTF film is key for professional results. Choose between hot-peel and cold-peel films based on your workflow—hot-peel films release easier after pressing, while cold-peel films give more time to adjust your transfer. Also, check the film thickness compatibility with your 24 inch DTF printer to avoid jams or print quality issues.
When threading the film through your printer, go slow and steady. Start by feeding the film through the tension bars and pinch rollers, making sure it’s snug but not too tight to prevent wrinkles or stretching. Next, guide the film carefully onto the take-up reel to keep it rolling smoothly. Proper film tension helps maintain stable feeding and clean prints.
Utilisation media markers on the film edges is a simple but effective way to ensure straight feeding. Align the film markers with your printer guides so the film moves straight through the printer—this avoids skewed prints or wasted material.
Accurate loading and threading help you maximize your 24 inch DTF printer’s performance with crisp, vibrant transfers every time. For detailed tips on preventing transfer adhesion issues and powder application, check out this guide on DTF powder toxic risks and safe handling.
Installation du logiciel et configuration du RIP
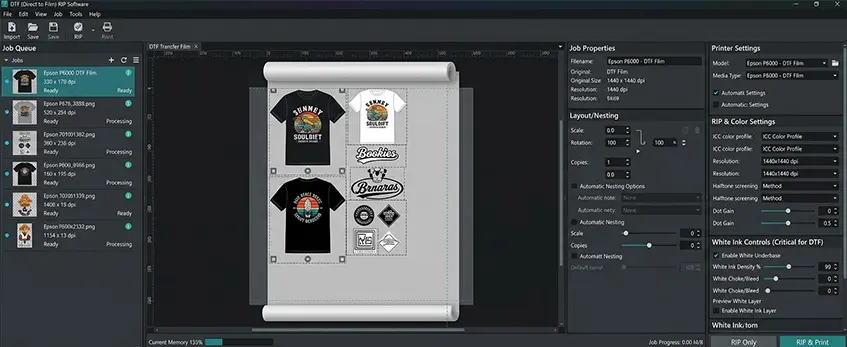
Setting up your 24 inch DTF printer starts with installing the right drivers and RIP software to ensure smooth, professional results. For best output, use recommended RIPs like AcroRIP or the dedicated software Jinlong supports, as these handle color management and print controls precisely for DTF workflows.
Next, focus on color profile selection. Loading accurate ICC profiles is crucial for vibrant, true-to-design colors that will impress your customers. Make sure to use profiles matched to your specific inks and media for reliable color output.
Key print settings to dial in include:
- Résolution : Aim for at least 1440×720 dpi to get crisp detail and smooth gradients.
- Densité de l'encre : Adjust according to fabric type and desired vibrancy; too much ink can cause issues, so balance is key.
- Pass Modes: Use 6 to 8 passes for professional-quality prints without banding.
- Print Speed: Find a speed that balances quality and throughput based on your shop’s volume needs.
By carefully configuring your RIP software and print settings, you’ll unlock the full potential of your 24\” DTF printer for consistent, high-quality results every time.
Calibration and Test Prints for Professional Quality
Getting your 24-inch DTF printer dialed in right is crucial for professional results. Start with a vérification de la buse to make sure every jet is firing properly—any clogged nozzles mean patchy prints and wasted material. Next up, do an alignment check to verify the printheads line up correctly; misalignment leads to blurry or doubled images. Adjust the head height as well to prevent smudges and ensure sharp details.
Once hardware checks are solid, print out test patterns that include density blocks, color swatches, and adhesion tests. These help you evaluate color vibrancy, white underbase coverage, and how well the ink sticks to the film. Fine-tune the sous-couche d'encre blanche to avoid excessive opacity or gaps—this step makes your colors pop on dark fabrics.
Ajuster limites d'encre et motifs en demi-teinte in your RIP software to balance ink usage without sacrificing quality. For best calibration and test print practices, referencing a detailed DTF printer calibration guide can help you maintain consistent, vibrant prints. Proper setup here ensures your printer performs smoothly day after day, producing professional-grade DTF prints.
Full DTF Workflow: From Print to Press
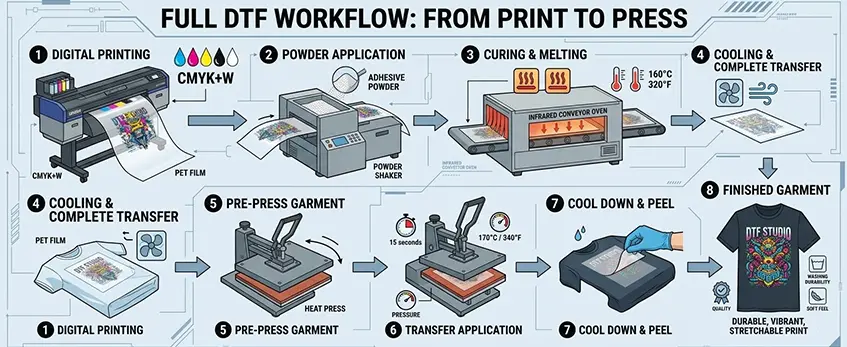
Getting professional results with your 24 inch DTF printer means mastering the entire workflow — from printing your design to heat pressing the final garment. Here’s a straightforward step-by-step guide.
Impression :
Prepare your files carefully—mirror your images before printing to ensure the design transfers correctly. Use gang sheets when printing multiple smaller designs to maximize your 24\” DTF printer’s capacity and reduce waste. Proper layout boosts throughput and efficiency.
Poudre Application :
After printing, apply a fine, even coat of DTF transfer powder over the wet ink. Use a good-quality DTF powder shaker for consistent coverage and shake off any excess powder. This step is crucial for proper adhesion and durability.
Le séchage :
Cure the powdered prints by drying them at a controlled temperature and time, generally around 160–165°F (70–75°C) for a few minutes based on your oven or dryer specs. Proper curing ensures the powder bonds well for wash-resistant transfers.
Weeding and Positioning:
Once cured, carefully weed out any unwanted film edges, then position your transfer on the garment. Pre-press your fabric to eliminate moisture and wrinkles, which helps with smooth, even transfer.
Pressage à chaud :
Set your heat press to 300–320°F with medium pressure, and press for 10–15 seconds. These settings lock in vibrant colors and achieve strong adhesion. Be consistent with pressure and timing to avoid peeling or incomplete transfer.
Post-Press :
Use the cold peel method—allow the transfer to cool completely before peeling off the film. This step prevents damage and preserves print vibrancy. If needed, give a final cure with a quick press to enhance durability.
Following this workflow with your 24 inch DTF printer ensures sharp, vibrant, wash-resistant transfers every time. For best results, use compatible materials like the Jinlong DTF transfer film 60cm Double Pro Series, designed specifically for professional-grade printing and pressing.
Optimization Tips for Consistent Professional Results
To get the most out of your 24 inch DTF printer, focus on maximizing opacity and vibrancy whether you’re printing on dark or light fabrics. Use a proper white ink underbase; this is key for making colors pop on darker garments. Adjust your ink density settings and pass modes in your RIP software to ensure smooth, vibrant coverage without wasting ink. For light fabrics, balance your ink layers to avoid excessive buildup that can cause stiffness.
Common issues like banding, ink starvation, or powder not sticking usually come down to maintenance or settings. Banding often means you need to run a nozzle check and clean the printhead to restore even ink flow. Ink starvation might be due to clogged lines or low circulation, so keep your white ink system flushed regularly. Ensure the powder shaker distributes powder evenly and that excess powder is properly removed before curing to prevent adhesion problems.
Maintain your printer daily and weekly with these simple steps:
- Head cleaning: Run automated or manual cleaning cycles to remove dried ink and prevent clogs.
- Ink circulation: Activate circulation pumps regularly, especially for white ink, to keep it fresh and flowing smoothly.
- Dust and environment control: Keep your workspace clean; dust can interfere with feeding and powder adhesion. Use a humidifier or dehumidifier to maintain ideal humidity (40–60%) and prevent static issues.
Following these optimization and maintenance practices will help you achieve durable, wash-resistant prints every time while extending the life of your 24\” DTF printer.
For a deeper dive into fine-tuning your printer settings and handling powder setup, check out our detailed DTF printer A3 setup guide with tips on ink, film, powder, and heat press.
Scaling Your Setup: Advanced Tips with Jinlong DTF
When your small or medium-sized shop starts handling 100+ prints daily, scaling your 24 inch DTF printer setup effectively is key for smooth, professional results. Here are some advanced tips, especially if you’re using a Jinlong DTF printer:
Batch Production Strategies:
Group jobs with similar colors or garment types together to minimize ink changes and powder adjustments. Use gang printing to fit multiple designs on one sheet, saving media and boosting throughput without sacrificing print quality.
Media Savings:
Optimize your layout in the RIP software to reduce film waste. Jinlong-compatible DTF films come in various thicknesses and peel types, so select what best matches your job demands and keep excess spending down. You can also refer to efficient DTF transfer film options suited for batch workflows like Jinlong’s A3 Double Pro Series.
Integrate Workflow Tools:
Pair your 24 inch DTF printer with automated powder shakers, curing ovens, and heat presses. Use RIP software that supports job tracking and batch management, reducing manual steps and mistakes. This streamlines printing, curing, and pressing phases.
Long-Term Care for Longevity:
Regularly run head cleaning cycles and keep ink circulation systems well-maintained to prevent clogs and banding. Keep your workspace temperature and humidity within recommended ranges (68–77°F, 40–60% humidity) to protect printer components and ink quality. Dust control and proper ventilation also reduce downtime.
By adopting these practices, your Jinlong 60cm DTF printer setup will stay efficient and consistent, helping your small business scale while delivering vibrant, wash-resistant prints every time. For support on advanced setup or parts, consider reaching out through Jinlong’s contact page.


