

DTF on Canvas Problems Solved with Expert Fixes and Tips
Ever tried DTF on canvas only to have your transfers peel off or colors fade right before your eyes? If you’re printing on canvas totes, bags, or art pieces, you know it’s a whole different ballgame than regular fabrics. The texture, absorbency, and thickness of canvas bring unique challenges that can trip up even experienced creators.
In this guide, we’re cutting through the guesswork with proven tips to solve the most common DTF on canvas problems—from sticky transfers and cracked prints to faded colors and smudging. Using jinlong DTF’s trusted inks, powders, and films, you\’ll learn exactly how to fix these issues and get consistent, vivid results every time without wasting materials or time.
Ready to master DTF printing on canvas and save your next project? Let’s dive in!
Understanding the DTF Printing Process on Canvas
Direct-to-Film (DTF) printing on canvas is a popular method to achieve vibrant, durable designs on textured materials. If you\’re new to this, the process might seem complex, but breaking it down step-by-step makes it manageable.
Step-by-step Printing Overview
Design Preparation
Start by creating or selecting your artwork. Use high-resolution images, and make sure colors are optimized for printing. For best results, apply custom ICC profiles designed for DTF printing on canvas.
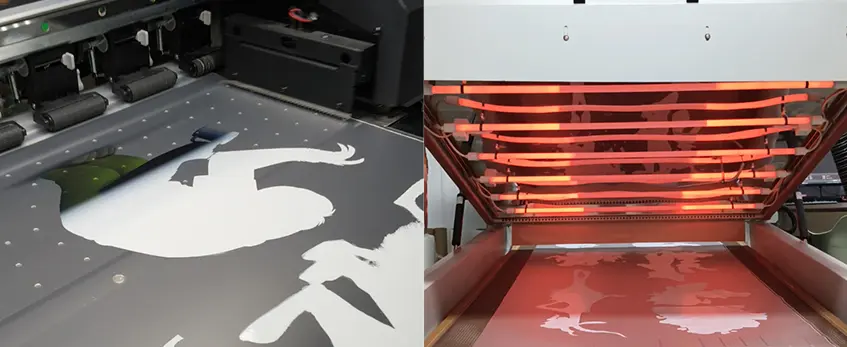
Printing on PET Film
Print your design onto a specialized PET film using your DTF printer. This step includes printing layers of white ink where needed—usually as a base layer to make colors pop on the textured canvas.
Powder Application
While the ink is still wet on the film, evenly apply a hot-melt adhesive powder. This powder ensures the design will stick firmly to the canvas during heat pressing.
Curing the Powder
The powdered film is then cured using an oven or heat source at controlled temperatures. This melts the powder, bonding it lightly to the ink and preparing the transfer for pressing.
Canvas Preparation
Preparing your canvas properly is critical. Clean the surface to remove dust and oils, and consider a light pre-press to flatten and heat set the fabric. This helps the adhesive bond much better.
Heat Press Transfer
Place the cured film with the design facing down on the canvas. Use a heat press with recommended pressure, temperature (usually around 320°F to 340°F), and time (20-30 seconds). These settings help activate the adhesive and embed the design into the fabric.
Peeling the Film
After pressing, peel the PET film off carefully. Depending on your process, you can use a cold peel or hot peel technique. Each offers advantages specific to canvas texture and ink curing.
Canvas Prep Tips for Better Results
- Clean your canvas thoroughly to avoid dust or debris disrupting adhesion.
- Avoid heavy fabric softeners before printing as they can reduce the bonding strength.
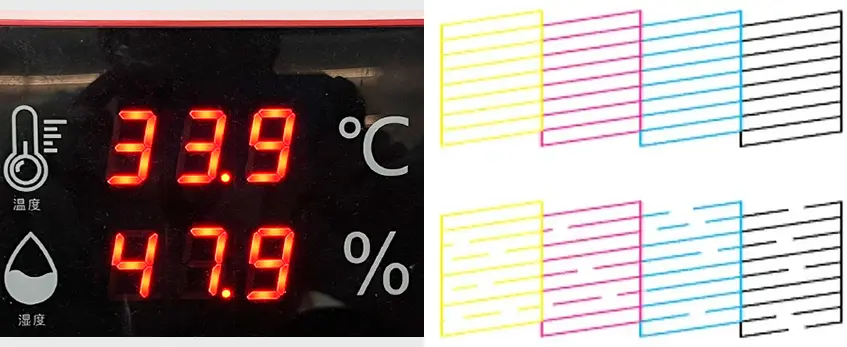
- Keep humidity levels moderate in your workspace; too much moisture affects powder curing and ink drying.
- Test different canvas weights and textures to find optimal material compatibility with your specific DTF setup.
Understanding each step and properly preparing your canvas will drastically reduce common printing problems. Following these basics sets the foundation for vibrant, lasting DTF prints on canvas every time.
Transfers Not Sticking or Peeling After Pressing
One of the most common headaches with DTF on canvas is transfers not sticking properly or peeling off right after pressing. This usually boils down to a few key causes:
- Insufficient heat or pressure during the heat press. Canvas can be thicker and tougher than other fabrics, so it needs the right balance of heat, pressure, and time to bond well.
- Improper powder application or curing. If the adhesive powder isn’t evenly applied or fully cured, the transfer won\’t stick properly.
- Incorrect canvas prep or surface texture. Canvas is a textured fabric and can need pretreatment or a clean, smooth area for the ink and adhesive to bond firmly.
- Peeling too soon or the wrong peel method. Peeling the transfer too hot or cold, or too quickly, can cause premature lifting and peeling.
Understanding these root causes helps address why your DTF transfers might fail on canvas and lays the groundwork to apply fixes that really work. For more tips on getting perfect DTF prints, check out our beginner-friendly guides on canvas and fabric printing.
Faded or Washed-Out Colors in DTF on Canvas: Root Causes
Faded or washed-out colors are a common headache when printing DTF on canvas. This usually happens because the ink isn’t bonding properly with the textured surface, causing dull or muted prints. One major cause is using incorrect ICC profiles that don’t match your printer or canvas type, leading to poor color accuracy.
Another factor is insufficient white ink coverage beneath the color layers. White ink acts as a base to make colors pop on canvas, especially darker or textured fabrics. If the white layer is too thin or uneven, colors will look faded. Also, low-quality or old inks can lose vibrancy quickly, so using high-grade inks designed for canvas is crucial.
Finally, heat press settings matter a lot here. Pressing at too low a temperature or for too short a time can leave inks undercured, resulting in washed-out appearances. Humidity in your workspace can also affect ink drying and curing, causing colors to look off.
Getting a grip on these root causes will save you a bunch of trouble and make your canvas prints consistently vibrant. For reliable color results, consider checking your ICC profiles and white ink passes closely while using trusted materials like the specialized jinlong DTF transfer film.
Cracking or Flaking in Designs
Cracking or flaking happens when the DTF print on canvas loses flexibility and breaks apart after pressing. This issue usually comes from improper curing temperature or low-quality film and powder. If the curing temperature is too high, the ink and adhesive can become brittle, causing the design to crack when the canvas flexes. Conversely, under-curing leaves the print weak, leading to flakes peeling off over time. Using the wrong type of transfer film that isn’t suited for canvas textures also contributes to this problem, as some films don’t bond well with the fabric\’s irregular surface. Additionally, too much powder or uneven powder distribution during the prep stage can make the design stiff and prone to cracking.
In short, cracking and flaking usually come down to these root causes:
- Excessive heat during curing
- Using incompatible or low-quality transfer film
- Uneven or heavy powder application
- Low-quality inks or printers not set up for canvas
Fixing these issues means adjusting your curing settings and switching to proven materials tested for canvas durability. For top-quality results, consider using a reliable transfer film designed specifically for canvas like the DTF transfer film from Jinlong to maintain flexibility and reduce cracking risks.
Uneven or Patchy White Ink Coverage
One of the most common headaches when printing DTF on canvas is uneven or patchy white ink coverage. This usually happens because canvas is a textured surface that doesn\’t absorb ink evenly. The white ink, which acts as a base layer for colors, may appear streaky or blotchy if the printer nozzles are clogged, or if the canvas fibers prevent smooth ink laydown.
Humidity also plays a big role. High moisture in the air can cause the white ink to dry irregularly, leading to inconsistency across the print. Additionally, insufficient or uneven powder application during the curing process can cause the white ink to flake off or look spotty once pressed.
Key causes:
- Clogged or malfunctioning printer nozzles
- High humidity affecting ink drying
- Uneven or inadequate powder curing on canvas
- The natural texture and weave of canvas interfering with ink adhesion
Fixing these issues means careful nozzle maintenance, controlling your workspace humidity, and adjusting powder application to suit the canvas texture. For those using jinlong DTF printers, routine nozzle checks and keeping your environment dry will improve white ink coverage significantly.
For optimal results, consider our DTF transfer film options designed to work well with textured fabrics like canvas, helping to minimize uneven ink problems.
Ink Smudging or Bleeding During Transfer
One common issue with DTF on canvas is ink smudging or bleeding during the transfer process. This typically happens when the ink hasn’t fully cured before pressing or when too much adhesive powder is applied unevenly. Canvas, being textured, can hold excess powder in the grooves, causing the ink to spread or smudge under heat and pressure. Another root cause is humidity; high moisture levels can interfere with powder adhesion and ink drying, leading to bleeding effects.
Improper pressing technique can also contribute—using incorrect heat press settings or peeling the transfer too soon allows the ink to move before it sets rigidly. Additionally, over-saturating the design with ink or using incompatible transfer films for canvas textures often results in blurred or bleeding edges.
To avoid ink smudging or bleeding, focus on curing powders properly, ensure consistent powder application, control humidity in your workspace, and optimize heat press time and temperature specifically for canvas transfers. For detailed adjustment tips suited for your setup, explore the powder curing challenges and heat press settings discussed in this DTF transfer film guide.
Top Common Problems with DTF on Canvas – Ghosting or Shadow Images
Ghosting or shadow images happen when a faint duplicate of the design appears slightly offset from the main print. This issue often results from incorrect peel timing, misaligned transfer film, or uneven pressing pressure. If the heat press is opened too early or the transfer film shifts during peeling, the ink can partially pull away and create a blurry double image on the canvas.
Other root causes include inconsistent peel techniques—like peeling too fast or at the wrong angle—and residual moisture on the canvas or film. Sometimes, the heat press settings are off, causing the ink or white base to not fully cure, which leads to imperfect adhesion and ghosting effects.
Ghosting is especially common on canvas because of its rough texture and the way it holds moisture. Ensuring a stable peel environment and correct press timings helps avoid this problem. For detailed tips on film handling and press settings optimized for canvas, consider checking out our guide on DTF transfer film basics.
Overly Stiff or Crinkled Prints
One common issue with DTF on canvas is prints that come out overly stiff or crinkled. This usually happens when too much hot-melt powder is applied or the curing temperature during heat pressing is too high. Excess powder creates a thick layer that reduces the flexibility of the print, making it feel brittle or rough. On the other hand, pressing at a temperature above the recommended range can cause the ink and film to shrink or warp, leading to crinkles in the design.
Other root causes include uneven powder distribution and improper post-press cooling. If powder isn’t spread evenly, some areas become thicker and stiffer. Also, removing the transfer film too early before the print cools fully can trap heat, causing wrinkles.
To avoid stiff or crinkled transfers, always apply powder in thin, even layers and follow exact curing temperature guidelines. Let the print cool completely with the film still on to maintain smooth, flexible results. Understanding these causes helps improve both print feel and durability on canvas substrates.
Printer Malfunctions Specific to Canvas Jobs
Printing on canvas with DTF can sometimes trigger specific printer issues not seen on other materials. Canvas’s textured surface and thicker build can lead to increased wear on printer heads and cause clogs. Poor ink flow or inconsistent white ink layering often happens because the canvas absorbs moisture differently, affecting nozzle performance. You might notice frequent misalignments or streaking due to the printer struggling with precise layer placement on the uneven canvas surface.
Other root causes include:
- Humidity and temperature fluctuations that affect ink viscosity and drying times.
- Incorrect printer settings optimized for fabrics but not for canvas texture.
- Inadequate maintenance, such as skipping regular nozzle checks or cleaning cycles, which lead to buildup and clogs over time.
- Using incompatible or low-quality white ink or film can also cause mechanical strain.
To avoid frequent breakdowns during canvas jobs, adjust your settings specifically for canvas printing, maintain strict cleaning routines, and use recommended inks and films designed for canvas surfaces. For detailed guidance on routine DTF maintenance and ink compatibility, consulting resources like the DTF printing core process analysis can be a big help.
Fix for Transfers Not Sticking: Pressure, Time, Powder Adjustments
If your DTF transfers aren’t sticking well to canvas, the issue usually comes down to heat press settings and powder application. Here’s what to do to fix it:
Adjust Pressure: Make sure your heat press pressure is firm but not crushing the fabric. Too little pressure means poor adhesion, too much can cause distortion. Aim for consistent even pressure over the entire design area.
Increase Pressing Time: Sometimes pressing for a little longer (around 15-20 seconds) helps the adhesive bond better with the canvas fibers. However, don’t overdo it to avoid scorching.
Apply Powder Evenly: The adhesive powder is crucial for good transfer. Shake or sprinkle it evenly on the printed film, then shake off excess powder before curing. Uneven or too little powder causes peeling or transfers not sticking.
Cure Powder Properly: Use a hot air blower or a curing oven to melt the powder before heat pressing. Insufficient curing means the powder won’t activate fully on pressing.
Keep in mind, canvas species and coatings may affect how much pressure/time you need. Testing small batches helps dial in the best settings. For optimal results, stick with quality materials like the jinlong DTF transfer film designed for durable adhesion on canvas.
With these tweaks, you should see your DTF transfers stick firmly without peeling or flaking after pressing.
Fix for Faded Colors: ICC Profiles and White Ink Passes
If your DTF prints on canvas look faded or washed out, the first thing to check is your ICC profiles. Using accurate ICC profiles tailored for canvas ensures colors come out vibrant and true-to-design. Make sure you’re using profiles specifically made for your jinlong DTF printer and the type of canvas you’re printing on.
Another common cause of dull colors is insufficient white ink coverage underneath the color layers. White ink acts as a base on canvas, especially dark or textured ones, helping colors pop. Increasing the number of white ink passes during printing improves opacity and color brightness.
Quick fixes for faded colors:
- Use the correct ICC profiles for your jinlong printer and canvas material.
- Increase white ink passes in your print settings.
- Perform regular white ink circulation to prevent blockages and keep coverage consistent.
- Test on small canvas pieces before full runs to dial in color vibrancy.
These tweaks help eliminate washed-out colors and keep your DTF canvas prints looking sharp and professional. For deeper guidance on choosing the right ink and printer settings, check out our detailed guide on how to choose the best DTF ink and printer for vibrant and durable prints.
Fix for Cracking Designs: Curing Temperature and Film Type
Cracking or flaking in your DTF prints on canvas usually points to issues with curing temperature or the transfer film quality. Here\’s how to tackle it when using jinlong DTF systems:
Adjust Curing Temperature: Too high heat can over-bake the ink, making prints rigid and prone to cracking after wear. Try lowering the heat in small increments (e.g., from 320°F to 300°F) while maintaining proper curing time. This helps the ink stay flexible yet fully bonded.
Choose the Right Film Type: Using a film that’s too stiff or incompatible with canvas texture can cause the design to crack when the fabric flexes. Opt for specialized films designed for textured or heavy fabrics like canvas, ensuring better adhesion and flexibility.
Check Curing Time: Over-curing can lead to brittleness. Confirm you’re following the recommended press time for your specific jinlong DTF powder and ink setup. Sometimes reducing press time by a few seconds can prevent cracking.
Pre-test Prints: Always run a small test batch with adjusted temperature and film type before full production. This helps avoid costly material waste.
By balancing curing temperature and selecting the proper film, you’ll see a significant drop in cracks or flakes, maintaining smooth, durable canvas prints.
For extra help optimizing your curing setup, refer to jinlong’s DTF printing guide for detailed recommendations on temperature and material compatibility.
Fix for Uneven White Ink: Nozzle Checks and Humidity Control
Uneven white ink coverage is a common hurdle when working with DTF on canvas, especially since white ink tends to be thicker and more prone to clogging. For jinlong DTF users, the first step is to regularly check your printer’s nozzles. This helps spot clogs or misfiring jets early before they cause patchy prints. Using jinlong’s automated white ink circulation system can also keep the white ink flowing smoothly and reduce blockages. You can find detailed tips on this in their guide about how jinlong’s automatic white ink circulation system works.
Another crucial factor is controlling the printing environment’s humidity. Canvas, being a textured fabric, absorbs moisture differently, which affects how white ink settles and bonds. Too much humidity can loosen ink adhesion, causing splotches or uneven layers, while too little can dry the ink too fast, leading to incomplete prints. Keep your workspace in a stable 40-60% humidity range to maintain optimal ink performance.
Quick fixes to try:
- Run frequent nozzle checks and head cleanings to avoid clogs.
- Use the jinlong printer’s white ink circulation features for better ink flow.
- Maintain consistent room humidity with a dehumidifier or humidifier as needed.
- Store white ink cartridges properly to avoid thickening or separation.
With these steps, your white ink coverage on canvas should become smooth and full, avoiding the frustration of patchy or uneven prints.
Fix for Ink Smudging: Powder Curing Environment and Canvas Mist
Ink smudging during DTF transfers on canvas usually happens when the powder doesn’t cure properly or the canvas surface retains too much moisture. For jinlong DTF users, creating the right powder curing environment is key. Make sure your curing area is clean, dry, and consistent in temperature – fluctuations can prevent the adhesive powder from setting correctly, causing smudging or bleeding.
Another common cause is the moisture from the canvas itself. Canvas can sometimes hold humidity, especially in warmer climates. Lightly misting the canvas before powder application can help balance this out, but avoid soaking it. Instead, a fine spray will loosen surface fibers just enough to improve powder adhesion without causing ink dispersion.
Quick fixes for smudging:
- Use jinlong’s recommended drying temperature and timing for powder curing.
- Maintain a dry, stable curing area—avoid high humidity.
- Lightly mist canvas with water before powder application to reduce excess dryness or moisture imbalance.
- Use consistent powder application to avoid clumps that don’t cure uniformly.
For best results, consider pairing these steps with jinlong’s specially formulated TPU DTF hot melt adhesive powder, designed to improve powder curing and reduce smudging issues on textured fabrics like canvas. You can find more details on this solution at the TPU DTF hot melt adhesive powder product page.
Fix for Ghosting: Film Cleaning and Peel Technique

Ghosting happens when you see faint shadows or double images after transferring your design onto canvas. It\’s usually caused by residue on the DTF film or improper peel timing. To fix this for your jinlong DTF setup, start by thoroughly cleaning the transfer film before printing—any dust or leftover powder can create ghost images. Use a lint-free cloth to wipe the film gently before each job.
Next, pay close attention to your peel technique. For most canvas printing, a cold peel method works best, where you let the film cool completely after pressing before peeling it off slowly. This helps the ink adhere properly without smearing or lifting. Avoid peeling too fast or while the print is still warm—it’s a common cause of ghosting.
If ghosting still shows up, double-check the heat press settings and make sure the pressure is consistent across the entire area. Uneven pressure can cause partial adhesion, leading to those unwanted shadows.
For more detailed guidance on DTF transfer film handling and to optimize your workflow, check out the DTF transfer film 60cm pro series which is specifically designed for clean, crisp transfers on canvas.
Fix for stiff prints: powder application and post-press temperature
If your DTF prints on canvas feel too stiff or crinkled, the problem usually comes down to too much powder or incorrect post-press temperature. Here’s how to fix it:
Adjust powder application: Use just enough hot-melt powder to cover the print evenly. Too much powder creates a thick layer that stiffens the fabric. For best results, lightly shake off excess powder before curing.
Control curing temperature: After powder application, curing at a high temperature or for too long makes the print rigid. Aim for around 160-170°C (320-340°F) for 30-40 seconds, but always test on small samples first.
Post-press cooling: Let your print cool flat without handling it right away. This prevents crinkles and helps the adhesive set smoothly into the canvas fibers.
Use the right film: Pair jinlong DTF transfer film designed for canvas with proper powder curing for softer prints. You can find options like the jinlong DTF transfer film 33cm Double Basic Series that are optimized for flexible results.
Following these steps will help you get vibrant, soft prints that feel natural on canvas without that unwanted stiffness.
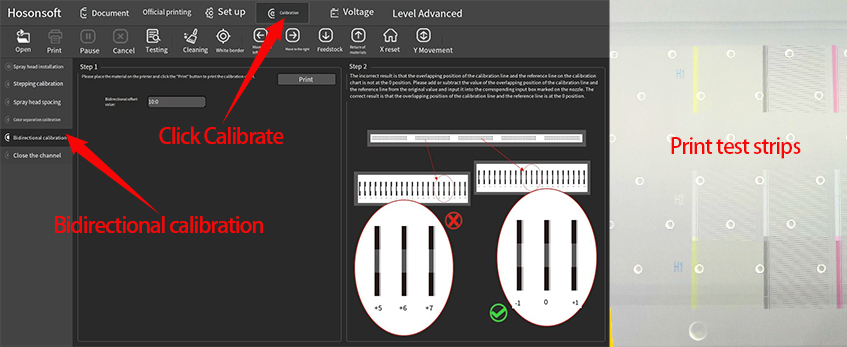
Fix for Printer Malfunctions: Software Settings and Hardware Maintenance
Printer issues during DTF on canvas jobs can slow down your production and affect print quality. To keep your jinlong DTF printer running smoothly, focus on both software and hardware fixes:
- Update and Calibrate Software: Make sure your printer driver and RIP software are up to date. Check that your printer settings match the canvas material, especially ink density and white ink layers. Incorrect profiles can cause clogs and misprints.
- Regular Nozzle Checks: Frequent nozzle cleanings prevent clogs, especially when printing white ink on textured canvas. Use your printer’s built-in cleaning cycles and run tests to confirm all nozzles fire properly.
- Maintain Ink System: Refill inks properly and avoid letting cartridges run dry. Stale or dirty inks can cause feeding issues or clogged heads.
- Clean and Inspect Hardware: Remove dust, lint, and residue from the printhead and rollers regularly. Check for signs of wear or misalignment, especially in belts and carriage parts.
- Temperature and Humidity Control: Keep your workspace climate stable to avoid condensation or drying problems inside the printer, which affect ink flow.
- Use Genuine Parts and Consumables: Stick to jinlong recommended inks, films, and powders to ensure compatibility and reduce printer stress.
Implementing these fixes helps prevent downtime, keeps your transfers crisp, and extends your printer’s life — key for consistent, high-quality DTF on canvas. For more tips, check out jinlong’s complete guide on DTF printing techniques and maintenance.
Prevention Strategies: Daily Cleaning and Ink Storage Routines
Maintaining clean equipment and properly storing inks are key to avoiding common DTF on canvas problems. Daily cleaning routines help prevent clogs, ink smudging, and uneven white coverage that can ruin prints. Here’s what I recommend:
- Clean printer nozzles and print heads daily to keep ink flow smooth and avoid color fading or patchy white ink.
- Remove any leftover powder residue from the printer and heat press area after every job to prevent smudging and ghosting on canvas prints.
- Store inks in a cool, dry place away from direct sunlight to maintain color vibrancy and prevent ink separation or drying inside cartridges.
- Keep ink bottles tightly sealed when not in use to avoid contamination and evaporation, which affects print quality.
- Flush your system regularly with maintenance solutions designed for jinlong DTF printers, especially when switching between ink types or colors.
Following these simple daily care steps will reduce downtime and keep your DTF transfers sticking well and looking vibrant on canvas every time. For more details on color consistency, checking out our guide on ICC profiles and color calibration is a great next step.
Prevention Strategies: Ideal Environmental Controls for Canvas Printing
Maintaining the right environment is crucial for consistent DTF on canvas results. Temperature and humidity play a big role in how well the ink and adhesive bond to your canvas. Aim for a temperature between 68°F and 77°F (20°C to 25°C) and keep humidity levels around 45% to 60%. Too much moisture can cause white ink issues and powder clumping, while dry air may lead to static or ink drying too fast.
A clean, dust-free workspace also helps prevent debris from sticking to the print, which can cause transfer flaws or white ink patchiness. Using air purifiers or dust covers for your DTF printer and heat press area reduces contamination risks.
Controlling airflow is another factor—avoid direct drafts near your machines, as they can affect drying times and powder curing. Stable environmental conditions ensure your prints stick well, color stays vibrant, and reduce chances of ink smudging or cracking.
For consistent quality, try to standardize these conditions daily, especially when handling large batches of canvas prints. Setting up a dedicated space with climate control can save time troubleshooting and cut down on waste.
If you’re using jinlong DTF inks and equipment, following these environmental guidelines alongside their recommended maintenance routines will help maximize your canvas printing output. For more information on inks optimized for canvas adhesion, check out the jinlong pro series high concentration DTF ink.
Prevention Strategies: Material Selection and Batch Testing Protocols
Choosing the right canvas material is critical for successful DTF printing. Opt for tightly woven, high-quality canvases designed for ink adhesion—coated or primed canvases often yield better transfer results. Always avoid overly rough or loosely woven fabrics, as they can cause poor ink bonding and peeling.
Before starting a full print run, batch testing is a must. Test each batch of canvas to check for color vibrancy, transfer adhesion, and ink curing behavior. This helps catch any inconsistencies in material texture, coatings, or moisture content that might affect the final print. Running a small test with your chosen transfer film and powder on the canvas in your usual environment isolates potential issues early and saves you from costly mistakes.
By combining the right material selection with thorough batch testing, you ensure smoother prints and reduce waste. For optimized results, consider using compatible DTF transfer films that match your canvas type and printer setup.
Scaling Tips for High-Volume Canvas Printing
When handling high-volume DTF on canvas jobs, efficiency and consistency are your top priorities. Here are some practical tips to scale up without sacrificing quality:
Standardize Your Prep Process: Use consistent canvas pretreatment and drying methods to ensure every piece responds the same way during printing and pressing.
Batch Printing With Quality Checks: Print in batches but take time to inspect transfers for adhesion, color vibrancy, and white ink coverage. Catch issues early to avoid waste.
Optimize Heat Press Settings: Lock in ideal time, temperature, and pressure settings for your specific canvas and DTF film combo. Make small adjustments only when needed.
Use High-Quality DTF Film in Bulk: Invest in reliable options like Jinlong Prints’ DTF transfer film double pro series that handle large runs with consistent release and minimal defects.
Maintain Equipment Regularly: Regular cleaning and preventive maintenance on printers and heat presses reduce downtime and prevent common problems like nozzle clogs or uneven pressure.
Control Workshop Environment: Keep humidity and temperature stable, as fluctuations can cause white ink issues or powder curing problems during large print runs.
Train Your Team: Make sure everyone involved knows the right handling, powder application, and pressing techniques to keep output uniform.
Using these scaling strategies helps cut down rejects and boosts throughput, making high-volume DTF canvas printing both profitable and hassle-free.
Advanced Tips and Case Studies: Peeling Fix Success Story and Output Boost
One common challenge with DTF on canvas is transfers peeling after pressing. A Jinlong DTF user recently tackled this by adjusting powder application and heat press settings. They switched to a higher-quality hot-melt adhesive powder from Jinlong’s standard series TPU DTF powder and increased pressing time by 10 seconds while applying firm pressure at 320°F. The result? No more peeling, even after multiple wash tests on canvas totes.
This simple fix boosted their production confidence and output, reducing waste caused by peeling issues. It also improved the overall feel of the print, preventing common stiffness and cracking problems. This case shows how targeted tweaks in powder choice and pressing technique can unlock better adhesion and long-term durability on canvas, helping businesses scale print runs smoothly without sacrificing quality.
Color Vibrancy Improvements with Custom Tweaks
Boosting color vibrancy in DTF on canvas often means going beyond standard settings. Small custom tweaks can make a big difference in how bright and sharp your prints appear on textured canvas surfaces.
Here are some proven steps to enhance your colors:
- Adjust ICC Profiles: Tailor your color profiles specifically for canvas material. This ensures the printer interprets colors correctly, avoiding dull or washed-out results.
- Increase White Ink Passes: Adding extra layers of white ink beneath your colors helps them pop, especially on darker or uneven canvas fabrics.
- Optimize Ink Density: Slightly upping the ink density setting can improve saturation but watch out for oversaturation that leads to smudging.
- Fine-Tune Heat Press Settings: Use recommended temperature and pressure settings, with minor tweaks based on your canvas thickness to lock in vibrant colors without damaging the material.
- Use Quality DTF Inks: Employing high-grade inks designed for canvas adhesion and vibrancy makes a clear difference in final output.
For those using jinlong DTF printers, take advantage of their customizable color profiles and white ink management tools. Combining these with proper DTF printer shaker and oven equipment guarantees more consistent and vivid prints every time.
With these tweaks, your canvas prints will look richer, more eye-catching, and ready to impress customers who expect that standout quality in every piece.
Hybrid Techniques Combining DTF with Spot Varnish
Using hybrid techniques that combine DTF printing with spot varnish can really push your canvas prints to the next level. Spot varnish adds a glossy or matte finish selectively over parts of your design, enhancing texture and depth that pure DTF alone can’t achieve.
This method works well on canvas because the varnish highlights specific areas—like logos or graphic details—making them stand out with extra shine or contrast. When paired with high-quality DTF transfer film, you get the best adhesion and color vibrancy before applying the varnish layer.
Here are some quick tips to get started:
- Print your DTF design first and press it onto the canvas. Make sure the white ink is fully cured for best durability.
- Apply spot varnish with a screen printing or UV coating process, focusing on key design elements.
- Test on sample pieces to balance varnish thickness—the right amount avoids stiffness or cracking.
- Combine with powder curing for smooth finishes that hold up in wash tests and handling.
This hybrid approach not only creates eye-catching effects but can also increase perceived value for custom canvas products. For those using Jinlong printers, following proper curing steps from the white ink curing essentials guide ensures your prints are ready for a varnish overlay without quality loss.
In short, adding spot varnish to your DTF canvas prints opens up new creative possibilities while boosting protection and style.
Advanced Tips and Case Studies: Community-Validated Troubleshooting Insights
When working with DTF on canvas, real-world experience from the printing community can be a game changer. Many users have shared practical tips and fixes that go beyond the basics. Here are some proven troubleshooting insights validated by seasoned DTF canvas printers:
Use Cold Peel for Better Adhesion on Canvas: While hot peel works on many fabrics, canvas often responds better to cold peel, reducing film release failures and improving transfer durability.
Optimize Powder Application: Applying the right amount of TPU powder evenly can prevent stiffness and cracking. Community feedback suggests light, even powder coats create softer prints with less flaking.
Control Humidity for White Ink Consistency: Since canvas is textured, white ink can be tricky. Several users recommend maintaining 40-50% humidity in your workspace to avoid uneven white ink coverage and nozzle clogs.
Regular Nozzle Maintenance for Canvas Runs: Frequent cleaning of the print head minimizes smudging and bleeding issues specific to canvas jobs. Many report better results when combining normal cleaning cycles with manual inspections.
Custom ICC Profiles Improve Color Vibrancy: Community members have shared custom ICC profiles tailored for DTF on canvas, enhancing color accuracy and preventing washed-out prints.
Batch Test New Canvas Materials: Before large runs, small batch testing on new canvas types helps catch adhesion or curing issues early, saving costly reprints.
These peer-tested tips offer practical, actionable solutions that many DTF canvas printers swear by. For detailed strategies on maintaining print quality, you can also check out how a DTF printer shaker and oven improve print quality and workflow, which is a must-read for anyone focused on consistent canvas results.
Leveraging community insights can save time and money while boosting confidence in your DTF canvas projects.


