
Es befinden sich keine Produkte im Warenkorb.

Jinlong
DTF-Transferdrucker-Setup-Anleitung Vollständige Schritte zum Drucken und Heißpressen
Verständnis der DTF-Drucktechnologie
What is Direct to Film (DTF) Printing?
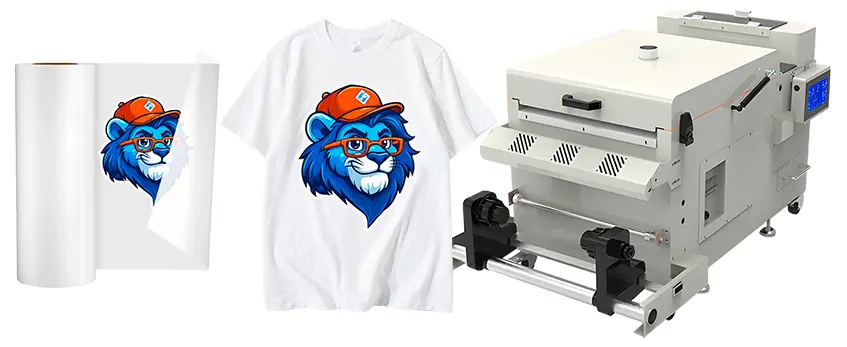
Direct to Film (DTF) printing is a versatile and innovative method that allows you to print full-color designs onto special PET films. Unlike traditional printing methods, DTF prints your artwork with both white and color inks directly onto a clear film, which is then coated with an adhesive powder. After curing, the design can be heat-pressed onto various fabric types, making it perfect for vibrant, durable garment customization.
Advantages of DTF Over Other Printing Methods
DTF printing stands out from other popular techniques like DTG (Direct to Garment), screen printing, and sublimation. Here’s why:
- Fabric Compatibility: Works on cotton, polyester, blends, and even nylon, unlike sublimation, which is limited to polyester.
- Langlebigkeit: Offers long-lasting prints with excellent wash resistance.
- Cost-Effective: Geringere Anlaufkosten im Vergleich zu DTG und Siebdruck.
- Keine Vorbehandlung erforderlich: Unlike DTG, DTF requires no garment pretreatment, simplifying preparation.
- Vibrant and Opaque White Ink: Ensures bright colors on dark and light fabrics.
- Schnellerer Turnaround: Multiple prints can be prepared quickly and stored before pressing.
Necessary Equipment Overview for DTF Transfer Printing
To set up your DTF transfer printer correctly and ensure smooth operation, here’s the essential equipment you’ll need:
| Ausrüstung | Zweck |
|---|---|
| DTF-Drucker | Prints the design onto special DTF films with white and color inks. |
| Puderstreuer | Applies and evenly distributes PET adhesive powder over the printed film. |
| Aushärte-Ofen | Cures the adhesive powder so it bonds properly during heat pressing. |
| Heißpressmaschine | Transfers the design from the film onto garments using heat and pressure. |
Setting up your jinlong DTF transfer printer with these tools ensures high-quality prints, lasting adhesion, and efficient production. In the upcoming sections, I’ll guide you through preparing your workspace and getting your printer ready for action.

Preparing Your Workspace and Equipment
Getting your workspace ready is a key step in setting up your jinlong DTF transfer printer for smooth operation. Ensure your area has good ventilation to reduce ink fumes and powder dust. Bright, even lighting helps in spotting print quality issues early. Safety is a must—keep the space clean, and have protective gear like gloves and masks handy when handling inks and powders.
Your power supply should match the printer’s requirements—usually a stable 110-120V outlet with enough amperage is needed for consistent performance. Also, control your environment: maintain humidity around 40-60% and keep the temperature stable between 68-77°F (20-25°C) to avoid ink drying or clogging problems.
When unboxing your jinlong DTF printer and materials, carefully inspect everything for damage. Check that the printer, powder shaker, curing oven, and heat press are all included and in good condition. Verify your films, inks, and powders for freshness. Proper setup and inspection at this stage lay the foundation for trouble-free DTF printing.
For a detailed overview of choosing the right printer and materials, you can check out this complete guide to custom t-shirt printing with jinlong DTF printers.
Step-by-Step Setup of Your jinlong DTF Transfer Printer
Getting your jinlong DTF transfer printer up and running is simpler than you might think if you follow these key steps carefully.
Connecting and Installing Software
Start by connecting your jinlong DTF printer to your computer using the provided USB or Ethernet cable. Next, install the official drivers and RIP software from the jinlong website or included USB drive. This software controls print quality and white ink layering, so make sure you use the latest version. Proper software setup is crucial for smooth operation and consistent results.
Loading Film and DTF Inks
Load the DTF transfer film according to the printer’s guidance—usually a glossy side up and lined up to feed straight. When it comes to inks, jinlong inks are specifically formulated for rich colors and sharp white layers. Use fresh, well-stored inks and install the cartridges carefully to avoid air bubbles or leaks. For tips on ink handling and film storage, see jinlong’s guide on DTF transfer film storage and handling tips for best results.
Printer Calibration: Nozzle Checks and Alignment
Before printing, perform nozzle tests to check for clogging or uneven ink flow. The printer’s software usually includes a quick nozzle check option. If you notice missing dots or streaks, run a cleaning cycle. Align print heads to ensure sharp, accurate prints without blurring or banding. Proper calibration extends printer life and helps avoid common printing issues.
Software Configuration for Optimal Print Settings
Adjust your RIP software settings to match your garment and artwork needs. Set the resolution—generally between 1440 to 2880 dpi for vibrant prints—and manage white ink layering carefully. The software should let you control white ink as a base layer or spot color for better color contrast on dark fabrics. Experiment with settings to find the balance between detail, speed, and ink consumption for your projects.
Following these steps will get you ready to produce crisp, durable DTF prints every time with your jinlong DTF transfer printer. For more details on choosing inks, visit jinlong’s guide on selecting the best DTF ink printer for vibrant and durable prints.
Printing Your Design on DTF Film
Preparing your artwork correctly is key for a smooth DTF transfer printer setup. Use RIP software to fine-tune your design—this helps control color management, ink density, and white ink layering. Always convert your artwork to CMYK and make sure the resolution is at least 300 dpi for crisp prints.
When selecting print mode and resolution, consider the garment type. For cotton or polyester blends, medium to high resolution with precise white ink layering works best. Lower resolutions can save ink but might reduce detail needed for finer designs.
In the actual printing process, DTF uses white ink as a base layer to ensure colors pop on any fabric color. The printer first lays down the white ink, then prints the color layers on top. This layering creates vibrant, lasting images.
Watch out for common printing issues:
- Tintenkleckse can happen if the film isn’t dry enough before powdering.
- Banding usually means the print heads need cleaning or calibration.
- Color inaccuracies may require adjusting RIP software color profiles or replacing old inks.
If you want deeper insights on starting strong with your prints and managing powder, check out this umfassender Leitfaden für DTF-Transferpapier und -Pulver for expert tips.
Applying PET Powder Adhesive
Applying PET powder adhesive is a critical step in the DTF transfer printing process because it ensures your design sticks firmly to the fabric. Without proper powdering, the print can peel off or lose its vibrant look after washing.
Why Powdering Matters
The powder acts as a glue between the printed DTF transfer film and the garment. When heated, it melts and bonds the ink to the fabric, giving your transfer durability and a soft feel.
Safe and Effective Powdering Techniques
Use a dedicated powder shaker for even application. This tool helps you spread the powder uniformly without clumps, reducing waste and mess. Always work in a well-ventilated area and wear a mask to avoid inhaling powder particles.
Tips for Even Powder Distribution
- Shake the film gently but consistently to cover the entire printed area.
- Avoid over-powdering, which can cause rough texture or waste.
- If excess powder falls off, collect it for reuse to minimize loss.
Aushärten des Pulvers
After powdering, curing is essential to melt the powder and activate its adhesive properties. You can use a curing oven with controlled temperature settings or pre-heat your heat press before placing the powder-coated film. Aim for about 160°C (320°F) for 2-3 minutes, but always follow your specific equipment’s guidelines to avoid overheating.
For the best powder options for durable and vivid results, explore the best DTF powder for high-quality and durable transfers recommended for use with jinlong DTF printers. This helps ensure your transfers stick well and last long after printing.
Heat Pressing: Transferring the Design to Garments
Using a heat press is the final critical step to transfer your design from the jinlong DTF transfer film onto your garment. There are two main types of heat press machines compatible with jinlong DTF printing: manual und automatic. Manual presses are great for small runs or custom jobs, while automatic heat presses speed up production for larger orders with consistent results.
Correct Temperature, Pressure, and Duration Settings
Getting your heat press settings right is key to avoid common issues like peeling, ghosting, or uneven transfers. Here’s a quick guide for different fabric types:
| Stoff Typ | Temperatur | Druck | Zeit |
|---|---|---|---|
| Baumwolle | 320°F (160°C) | Mittel bis fest | 15 Sekunden |
| Polyester | 300°F (150°C) | Mittel | 15 Sekunden |
| Mischungen | 310°F (155°C) | Mittel bis fest | 15-20 Sekunden |
Adjust pressure to ensure the film is firmly bonded without damaging your fabric. Always warm up the heat press before starting.

Step-by-Step Heat Pressing Process
- Preheat the heat press according to your fabric type.
- Place the garment flat on the press platen, smoothing out wrinkles.
- Position your printed DTF film design face down on the garment.
- Apply the correct pressure, temperature, and time as outlined.
- Once done, remove the garment carefully.
Cooling and Peeling Methods
Proper peeling is critical to a successful transfer. You can either do a heißes Peeling or a Kaltpeeling, depending on your film and ink.
- Heißes Peeling: Peel the PET film immediately while the design is hot. This helps reduce ghosting with some jinlong DTF films.
- Kaltes Peeling: Allow the garment and film to cool completely before peeling off the PET film. This is often recommended for delicate fabrics.
Experiment with both to see which gives you the best adhesion and image clarity on your specific garments.
Following these heat press best practices will ensure your jinlong DTF transfers come out sharp, vibrant, and long-lasting every time. For more details on the entire printing and heat press workflow, check out this best DTF transfer printer buying guide on performance and durability.
Post-Press Finishing and Quality Check
After transferring your design with the jinlong DTF transfer printer, it’s important to inspect each print carefully. Check for strong adhesion to the garment and vibrant, clear colors. Poor adhesion or dull prints usually mean the heat press settings need adjustment or the powder wasn’t cured correctly.
For garment care, advise customers to wash items inside out in cold water and avoid harsh detergents or bleach. Hang drying is best to maintain print quality and avoid cracking or peeling. This guidance helps keep your DTF prints looking fresh for longer.
To keep your equipment running smoothly, follow regular maintenance routines. Clean print heads and nozzles to prevent ink drying or clogging, and keep the heat press free of residue for even pressure. Proper upkeep not only extends your printer and heat press lifespan but also ensures consistent print quality over time. For detailed cleaning tips, check resources on troubleshooting and maintenance to optimize your setup.
Troubleshooting Common Problems During Setup and Printing
Setting up your jinlong DTF transfer printer can sometimes come with hiccups. Here’s a quick guide to solve common issues so your workflow stays smooth.
Ink Drying or Clogging Problems
- Make sure you use the right ink type and avoid letting the printer sit idle for too long without printing.
- Regular nozzle checks and cleaning cycles prevent blockages.
- Keep your workspace climate-controlled; high humidity or dust can cause drying or clogging.
Powder Adhesion Failures: Causes and Fixes
- Uneven or insufficient powdering is often the culprit. Use a quality powder shaker for consistent application.
- Check if the powder is curing properly—under- or over-curing affects adhesion. For curing tips, check recommended practices with a jinlong DTF powder shaker and curing oven.
- Use fresh powder stored in dry conditions to maintain effectiveness.
Heat Press Issues Like Uneven Transfer and Wrinkles
- Uneven pressure or incorrect temperature settings cause poor transfer and wrinkling. Follow the best heat press settings for DTF, adjusting by textile type.
- Avoid moving the garment during pressing and ensure the platen is clean and flat.
FAQs from User Feedback
- How often should I clean print heads?
- What’s the best way to store DTF films to avoid curling?
- Why is white ink not printing correctly?
- When to use hot peel vs cold peel after pressing?
These quick fixes and answers save time and keep your DTF printer setup hassle-free. For more detailed troubleshooting, the DTF printing vs DTG printing page also offers useful insights on managing print quality challenges.
Tips to Maximize Output and Longevity of Your jinlong DTF Equipment
Getting the best performance from your jinlong DTF transfer printer means balancing speed, quality, and maintenance. Here’s how to optimize your workflow without sacrificing print quality:
Optimize Print Speed Without Losing Quality
- Use the recommended print modes and resolutions in your printer software; pushing speeds too high can cause banding or color inconsistencies.
- Regularly calibrate your printer for perfect nozzle alignment – this keeps prints sharp and consistent.
- For bulk jobs, batch similar designs and colors together to reduce ink changes and setup time.
Ink Conservation and Management Best Practices
- Always use genuine jinlong DTF inks designed for your printer for consistent color and adhesion.
- Keep inks sealed when not in use to avoid drying and clogging.
- Use the printer’s cleaning functions sparingly; excessive cleaning cycles waste ink.
- Adjust white ink layer settings carefully — this color uses the most ink and can be optimized depending on fabric type.
Proper Storage to Maximize Shelf Life of Films, Powders, and Inks
- Store DTF transfer films in a cool, dry place, away from direct sunlight to avoid moisture buildup or discoloration. Consider products like the DTF-Übertragungsfolie 60cm doppelt STD-Serie for reliable quality.
- Keep DTF adhesive powder sealed in airtight containers to prevent clumping.
- DTF inks should be stored in a stable temperature environment (ideally between 59°F to 77°F) to prevent degradation and maintain viscosity.
By following these tips, you not only preserve your jinlong DTF printer’s health but also secure consistent, high-quality prints day after day. For more on maintaining your workflow, check out how a DTF printer with shaker and oven improves print consistency and speed.


