DTF Transfer Machines Guide Printers Shakers Ovens Heat Presses 2026
The Complete DTF Workflow – Step by Step
DTF (Direct-to-Film) printing follows a straightforward, efficient workflow that anyone starting a t-shirt business should understand. The process breaks down into five clear steps:
Design
Create your artwork using graphic design software. High-resolution, vibrant designs work best for DTF printing to ensure sharp details.
Print
Load your design onto a DTF printer, which prints the image in CMYK plus white ink directly onto a special PET film. This film serves as the carrier for your transfer.
Apply Powder
While the ink is still wet, apply a fine adhesive powder to the film. This powder sticks to the ink and helps bond the design to the fabric during heat pressing.
Cure
The powdered film passes through a curing oven that melts the powder, securing it on the film and preparing it for transfer. Proper temperature and timing here are crucial to avoid issues.
Transfer
Finally, place the cured film onto your garment and use a heat press to transfer the design. After pressing, peel the film to reveal a vibrant, durable print.
Visual Workflow Diagram Recommendation
To make this workflow easier to follow, an infographic showing each step with icons and brief captions works well. Visual cues help new users understand the process at a glance, especially when training staff or explaining DTF printing to clients.

Time Per Shirt Estimates
Print speeds and setup times vary depending on machinery and workflow automation:
- Entry-level desktop setups: About 6–8 minutes per shirt
- Mid-range 24-inch printers with automatic powder shakers: 3–4 minutes per shirt
- High-end production lines with roll-to-roll printers and conveyor curing ovens: 1.5–2 minutes per shirt
These estimates include printing, powder application, curing, and pressing but can improve as operators gain experience. Want to print 300 shirts a day without babysitting the shaker? Investing in automation really pays off.
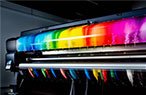
DTF Printers – The Heart of the System
DTF printers are the core of any direct-to-film transfer setup, and they work quite differently from DTG (direct-to-garment) and traditional screen printing. Unlike DTG, which prints directly onto fabric, DTF printers print your design onto a special film that will later transfer to the garment. This method offers more versatility with fabric types and better color vibrancy.
The most common print heads powering DTF printers today include Epson’s popular models like the i3200, XP600, and i1600-2H. These heads are prized for their precision and reliability. The printers typically use CMYK inks combined with a dedicated white ink system, which requires a white ink circulation setup to keep the pigment flowing smoothly and prevent clogging.
When comparing DTF printers, look at key specs such as print width options: 13-inch models work well for smaller jobs, while 24-inch and 24-inch+ wide printers handle higher volume and larger designs. Another important factor is whether the printer has a single or dual print head—dual heads can speed up production. Roll-to-roll capability is also crucial if you plan to run long print jobs continuously.
For 2026, top DTF printer models range from compact A3 desktop setups perfect for startups to 60cm (24-inch) wide machines designed for mid-sized shops. These offer a good balance between quality and speed, making them suitable for most US-based businesses. For reliable supplies, pairing these printers with quality transfer films like those in this 60cm double basic series can make a big difference in final print durability and color sharpness.
Powder Shakers – Why Automation Matters

Applying the right amount of powder is crucial in the DTF transfer workflow. Manual powder application can lead to uneven coverage and waste, while automatic powder shakers bring consistency and efficiency.
How Powder Shakers Work
Most powder shakers use vibration to evenly coat the wet print with adhesive powder. The excess powder typically falls through a screen and is collected for recycling, reducing waste significantly.
| Feature | Manual Powder Application | Automatic Powder Shaker |
|---|---|---|
| Consistency | Inconsistent | Highly consistent |
| Powder Waste | High | Reduced with 30–50% recovery |
| Speed | Slower | Faster, suited for production |
| Labor | Manual effort required | Automated process |
Wet-on-Wet vs Wet-on-Dry Capping
- Wet-on-Wet: Powder is applied immediately after printing, before curing. This method can increase adhesion but requires precise timing.
- Wet-on-Dry: Powder is applied after curing, typically used for specialty prints or when blending layers.
Integrated vs Standalone Units
- Integrated shaker/dryer combos save space and streamline workflow but can have higher upfront costs.
- Standalone shaker or dryer units offer flexibility but require more space and handling.
Automated DTF powder applicators not only improve quality but also help save powder and reduce waste — a win-win for your production budget and the environment.
For more info on efficient powder use, check out this TPU DTF hot melt adhesive powder available in bulk.
Curing Ovens – Turning Film into Transfer-Ready Sheets
Curing ovens are vital for transforming the printed DTF film into a transfer-ready sheet. The main types available are convection ovens, infrared ovens, and hybrid models that combine both technologies. Convection ovens use hot air circulation for even curing, while infrared ovens heat the film faster but can risk uneven curing if not properly managed. Hybrid curing ovens aim to balance speed and consistency for improved results.
Ideal Temperature & Time Settings (2026 Standards)
For best results in 2026, keep curing ovens set between 120°C to 140°C (248°F to 284°F), with timing generally around 2 to 5 minutes depending on oven length and powder thickness. Maintaining this balance helps avoid under-curing, which causes weak adhesion, or over-curing, which can lead to cracking.
Horizontal vs Vertical Oven Designs
Horizontal ovens are the most common and handle film smoothly across flat conveyor belts. Vertical ovens save floor space by curing film on hanging racks but may require more careful handling to prevent film distortion.
Common Problems & Solutions
- Under-curing: Leads to poor powder adhesion and weak prints. Make sure temperature and time settings align with powder specifications.
- Over-curing: Causes brittleness and potential cracking during transfer.
- Powder blow-off: Too much heat or air pressure can blow powder away—adjust airflow settings to prevent waste.
Length Options for Various Workflows
Curing zones typically measure 70cm, 100cm, or 120cm. Longer ovens accommodate faster production speeds and thicker powder layers but take up more space and electricity.
Choosing the right curing oven with dependable temperature control and consistent airflow is key to producing high-quality DTF transfers every time. For the best results, pair your oven with quality powders like the reliable TPU DTF hot melt adhesive powder engineered for optimal curing performance.
Heat Press Systems – The Final Step

Heat press machines are the last and most crucial step in the DTF transfer workflow. Choosing between manual and pneumatic auto-open heat presses depends on your production volume and budget. Pneumatic presses offer faster cycle times and consistent pressure, reducing operator fatigue—great for busy shops.
Size Recommendations
- 16×20 cm: Ideal for small prints and samples
- 40×50 cm: The sweet spot for most T-shirts and general apparel
- Large-format 60×80 cm: Perfect for oversized transfers or bulk printing
Pressure, Temperature & Time Settings
- Cotton: About 160-170°C (320-340°F) for 15-20 seconds at medium pressure
- Polyester: Slightly lower temperature, around 150-160°C (300-320°F) to avoid melting, same time
- Blends: Adjust between cotton and polyester settings depending on material ratio
Press Types: Pros and Cons
- Drawer-style: Easy to load/unload; better for precise positioning but slower cycle times
- Clamshell: Space-saving and fast presses but limited access to the lower platen
- Swing-away: Offers full access to the platen; preferred for complex or delicate transfers but takes up more space
New Features to Watch in 2026
- Auto-release function: Automatically opens the press after the cycle, boosting productivity
- Dual platen systems: Allow for loading one garment while pressing another, increasing throughput
- Laser alignment guides: Help ensure perfect print placement every time, reducing waste
Finding the right heat press system tailored to your DTF operation can dramatically improve your workflow and quality. For detailed tips on heat press timing and settings, check out resources covering DTF heat press settings.
All-in-One DTF Systems vs Modular Setups
When choosing between all-in-one DTF systems and separate modular setups, it’s important to weigh the pros and cons based on your business needs.
Pros of All-in-One DTF Systems
- Space-Saving: Combines printer, shaker, and oven into one compact unit, ideal for small shops with limited space.
- Simplified Workflow: Integrated systems can streamline the production process, reducing the need for manual transport between machines.
- Lower Initial Setup: Often more affordable upfront compared to buying each component separately.
- Good for Beginners: Easier to set up and operate without juggling multiple devices.
Cons of All-in-One Systems
- Limited Customization: You’re stuck with fixed specs—often smaller print widths and basic curing options.
- Lower Production Volume: Typically suited for entry-level to mid-range output (under 100 shirts/day).
- Maintenance Complexity: A problem in one section (printer, shaker, or oven) can halt the entire workflow.
When to Choose Separate Components
- You’re aiming for higher production volumes (500+ shirts/day).
- Need flexibility to upgrade or swap out parts, like investing in a high-end Epson i3200 DTF printer or a larger curing oven.
- Want top-tier print quality and speed, which modular setups often deliver by combining specialized machines.
- Have enough space and budget for a more extensive setup.
Real Cost Comparison
| Setup Type | Entry-Level Cost | Mid-Range Cost | Production-Grade Cost |
|---|---|---|---|
| All-in-One System | $5,000 – $10,000 | $10,000 – $18,000 | Rare / specialized |
| Modular Components | $7,000 – $12,000 | $15,000 – $25,000 | $25,000 – $40,000+ |
All-in-one setups can be a budget-friendly start, but expect limitations as your business grows. Modular setups cost more but offer scalability, performance, and easier maintenance.
If you want a deeper dive into selecting the right printer and setup, check out this detailed guide on professional DTF printing tips, which explains how to extend printhead lifespan and optimize your equipment investments.
How to Choose the Right DTF Machines for Your Business
Choosing the right DTF transfer machines depends mainly on your production volume, budget, and workspace. Let’s break it down by daily output and what you should look for in 2026.
Production Volume Tiers & Recommended Setups
| Daily Volume | Recommended Equipment | Approximate Budget | Space & Power Needs |
|---|---|---|---|
| Under 50 shirts | A3 or 24-inch DTF printer + manual powder shaker + compact oven + manual heat press | $5,000 – $10,000 | Small footprint, standard 110V power outlets |
| 100–500 shirts | 24-inch dual-head printer + automatic powder shaker + 100–120cm curing oven + pneumatic heat press | $15,000 – $25,000 | Medium space, possibly 220V for ovens |
| 500+ shirts | Wide-format 60cm+ roll-to-roll printer + industrial shaker/oven combo + large-format auto heat press | $25,000 – $35,000+ | Larger workspace, dedicated power supply |
Key Considerations
- Budget: Entry-level complete setups start around $5k but expect to pay upwards of $35k for production-ready systems with automation.
- Space: Oven length and printer size directly impact your workspace layout. Small studios can manage with compact ovens (70–100 cm), while high-volume shops need longer curing zones.
- Power: Most small to medium machines run on standard 110V, but larger ovens and industrial heat presses usually require 220V setups.
For beginners, pairing a reliable 24-inch DTF printer with a manual shaker and smaller oven is a solid way to start without overwhelming costs or space. If your goal is scaling fast, investing in automatic powder applicators and pneumatic heat presses will save time and improve consistency.
To get a better idea of films and DTF materials that work smoothly with these machines, check our detailed guide on DTF transfer film options and printing basics.
By matching your machine choice to your output goals and workspace, you can avoid overspending while making sure your production line runs efficiently.
Common Mistakes Beginners Make & How to Avoid Them
Starting with DTF transfer machines can be tricky if you’re not careful. Here are some common beginner mistakes and how to avoid them:
Using the wrong powder amount: Too much powder leads to clumpy transfers and waste, while too little means the design won’t stick properly. Use just enough powder for full coverage and consider investing in a reliable DTF powder shaker machine to get consistent results and reduce powder waste.
Bad film tension: Films that aren’t tight enough can cause misaligned prints or wrinkles during curing. Make sure your film is loaded smoothly and evenly on the printer and oven rollers.
Incorrect curing settings: Under-curing leaves the powder wet and prone to smudging, while over-curing can damage the film or cause powder blow-off. Follow recommended DTF curing oven temperature and timing guidelines for your specific oven model.
Poor heat press setup: Using incorrect pressure, temperature, or timing settings on your heat press system impacts transfer quality and durability. Tailor your settings by fabric type—cotton, polyester, or blends—and check your machine\’s manual for ideal parameters.
Maintenance Tips to Extend Machine Life
Keeping your DTF equipment in good shape means less downtime and better prints:
Clean print heads regularly to prevent clogs, especially if you use white ink circulation systems prone to settling.
Empty powder shakers and recycling units periodically to avoid build-up that can jam the system.
Calibrate your curing oven and heat press occasionally to maintain consistent temperature and pressure.
Store films and powders in cool, dry places to preserve material quality.
Mastering these basics early will save you time, money, and headaches as you grow your DTF business. For more detailed guidance, check out this comprehensive DTF transfer machines guide for custom printing.
Future of DTF Technology (2026–2026 Trends)
The future of DTF transfer machines is shaping up to be faster, greener, and more automated than ever before. In 2026 and moving into 2026, we’re seeing print heads that can deliver quicker, sharper prints without sacrificing quality—great news for shops ramping up production. Expect more eco-friendly powders hitting the market too, offering sustainable options without compromising vibrant colors or strong adhesion.
Larger format printers and ovens are becoming the norm, allowing bigger or multiple prints in one run, which helps improve efficiency. On top of that, full automation is making waves. From automatic powder applicators to integrated curing and transfer systems, these advances reduce manual labor and cut down errors. If you’re looking to stay ahead in this space, keeping an eye on seamless workflows and energy-saving features is key.
For those just starting out or upgrading machines, consider setups that embrace these trends for better long-term value and growth potential in your DTF business.