

2026 Desktop DTF Printer Setup Guide with Ink Film and Heat Press Tips
Phase 1: Workspace Environment & Hardware Initialization
Climate Control is Critical: Ideal Temperature and Humidity Management
Setting up your desktop DTF printer in a stable environment is the first step toward consistent print quality. Aim for a temperature between 68-77°F (20-25°C) and maintain relative humidity around 45-60%. Fluctuations outside these ranges can impact the textile pigment ink flow and white ink circulation system (WICS), leading to clogging or uneven prints. Use a quality thermostat and humidifier/dehumidifier to keep conditions steady.
Ventilation & Safety Setup for Desktop Spaces
Good ventilation is essential when working with inks, powders, and heat presses in enclosed spaces. Ensure your workspace has:
- Proper airflow to remove fumes safely
- An exhaust fan or air purifier near the printer
- Fire safety measures especially around heat press areas
This setup protects your health and maintains a clean printing environment for the Jinlong DTF printer and other equipment.
Jinlong DTF Printer Installation: Unboxing, Removing Locks, Driver and Connectivity
When your desktop DTF printer arrives, carefully follow these steps:
- Unbox the printer on a sturdy table or desk
- Remove all transit locks and protective materials to avoid printer damage
- Connect the printer to power and your PC via USB or Ethernet
- Install the Jinlong driver software following the user manual\’s instructions
- Confirm printer recognition in the system, then run a test print to verify connectivity
Proper hardware initialization sets a solid foundation for reliable DTF printing and helps prevent common startup issues like printhead clogging or connectivity failures.
This clear workspace and hardware setup ensures your direct-to-film printing workflow begins smoothly with the Jinlong DTF system, tailored for maximum production efficiency and durability.
Phase 2: Mastering the Consumables (Ink & Film Chemistry)
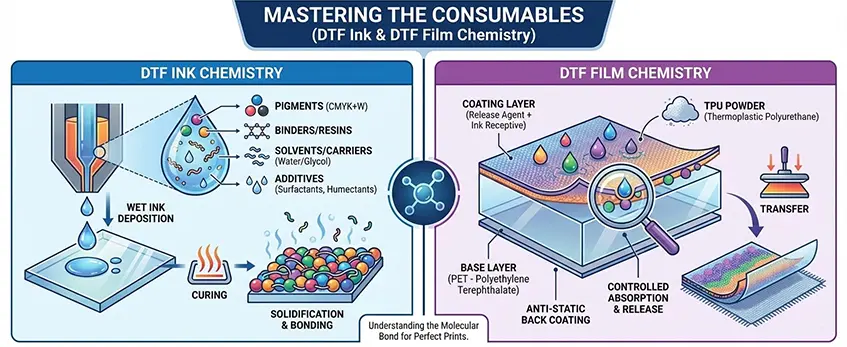
Getting your ink and film right is key to smooth prints and vibrant colors on your desktop DTF printer. First, pay close attention to white ink management — a good white ink circulation system (WICS) keeps the pigment ink from settling and clogging your printhead. Regularly check and stir the white ink to avoid separation, which affects print quality and can cause nozzle clogging.
When loading CMYK inks, always prime the cartridges gently to prevent air bubbles and ensure consistent flow. Avoid overfilling and use the recommended pigment ink to maintain the ideal viscosity for your Jinlong printer. Proper ink loading directly affects color accuracy and nozzle performance.
Choosing the right PET film is another important step. Decide between hot peel or cold peel film based on your transfer needs:
- Hot peel PET film lets you peel immediately after heat pressing, speeding up production, but requires precise temperature control.
- Cold peel PET film can be peeled after cooling, which is easier but slows down your workflow.
Also, check the coating quality of the film—better coatings hold the TPU adhesive powder better and work smoothly with the ink layer. The film’s surface texture and compatibility with your ink viscosity will impact the sharpness and durability of your prints.
For a reliable source of high-quality transfer film options designed for desktop usage, explore Jinlong’s lineup at their DTF transfer film series. This helps ensure your consumables complement your printer for top performance.
By mastering these consumable details—white ink circulation, proper CMYK loading, and selecting the right PET film—you set a strong foundation for a consistent and efficient direct to film printing workflow.
Phase 3: Software & RIP Settings (The Digital Setup)
Getting your software and RIP settings dialed in is key to consistent, vibrant prints with your desktop DTF printer. First, make sure you’re using the ICC color profile for DTF that matches your Jinlong DTF printer and inks. This profile helps keep your colors accurate and true to the design, avoiding common issues like color shifts or dull prints.
When setting up your print file, pay close attention to the white ink layer generation. Use choke settings to slightly reduce the white ink edges—this prevents unsightly white halos around your image. Adjusting white ink density is also critical: too much ink clogs the film, too little makes whites look faded. Balance is key for sharp, opaque prints.
Choosing the right balance between resolution and speed depends on your production goals. Higher resolutions (like 1440 dpi) provide crisp details and smooth gradients but slow down printing. For fast desktop production with decent quality, a medium resolution setting is often best. Always test and adjust based on garment type and print complexity.
Fine-tuning your RIP software means better color accuracy, smooth white layers, and optimized speed — all essential for a streamlined Direct to Film printing workflow. If you’re new to these settings, the Jinlong printer manual or support can provide tailored guidance.
For advanced customization and troubleshooting DTF powder issues in your workflow, consider checking detailed guides on how to choose the right DTF powder shaker and common problems with powders to keep prints durable and vibrant.
Phase 4: The Powder & Curing Process (Heat Press Tips)

Applying DTF powder evenly is key for sharp, durable prints. Use a fine TPU adhesive powder with consistent grain size to ensure smooth coverage without clumps. Lightly shaking the powder onto the fresh print or using a powder shaker system helps distribute it uniformly. Avoid over-powdering, which can cause uneven curing and reduce wash fastness durability.
When it comes to curing, both the oven and heat press have their perks. The curing phase sets the adhesive powder to the film, locking in the print quality. If you’re using a curing oven, set the temperature typically between 160-170°C (320-338°F) for about 2-3 minutes, ensuring even heat circulation without overheating. For desktop DTF setups without an oven, the heat press hover method is an excellent alternative. This involves heating the print at a set temperature (around 160°C) without fully pressing down, “hovering” the press slightly above the film to melt the powder without smudging.
Here are quick tips for the heat press curing phase:
- Preheat the press to the recommended temperature for your film and powder.
- Use the hover method to avoid compressing wet prints prematurely.
- Follow with a quick final press to secure the print and enhance durability.
- Monitor curing time closely—too short and the powder won’t set; too long can cause yellowing or distortion.
Mastering the powder application and curing phase directly impacts print longevity and color vibrancy on textiles. For more on selecting the right film, check out our detailed guide on DTF transfer film available in single and double-layer options.
Phase 5: The Transfer & Finishing
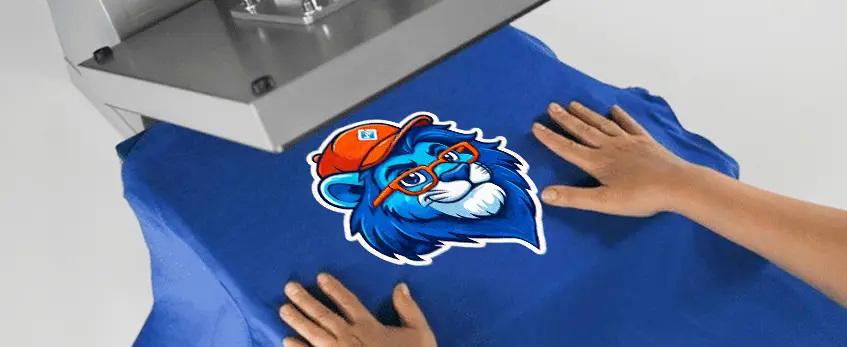
The heat press step is critical for a durable and vibrant print. Start with a pre-press on your garment for about 5-10 seconds to remove moisture and wrinkles, which helps ink adhere better. Set your heat press temperature between 320°F to 350°F, but always refer to your specific DTF film and ink guidelines to avoid scorching.
When transferring, place the printed PET film carefully on the fabric. Choose your peel method based on your project:
- Instant Hot Peel: Peel the film immediately while it’s hot. This method usually results in a softer print feel but requires precise timing.
- Wait-to-Cool Peel: Let the print cool completely before peeling the film off, giving a better ink adhesion and enhanced durability.
After peeling, always do a second press for 10-15 seconds with a protective parchment paper or Teflon sheet. This final step seals the print, improving wash fastness durability and ensuring the ink bonds well to the fabric for long-lasting results.
Using quality PET films like those from the Double Basic Series can make a noticeable difference in transfer ease and print sharpness. Combine this with the right heat press temperature settings and peeling technique for the best finish on your desktop DTF prints.
Phase 6: Daily & Weekly Maintenance Routine
Keeping your desktop DTF printer in top shape comes down to consistent maintenance. Here’s a simple routine to protect your investment and avoid printhead clogging and other issues.
Daily Start-up Tasks: Nozzle Checks and Wiper Cleaning
Every morning before printing, perform a quick printhead nozzle check to catch clogs early. Most Jinlong DTF printers have an automated test pattern you can run from the RIP software to ensure all nozzles spray correctly. Follow that with a gentle wiper cleaning to remove any residual ink or dust on the printhead surface. This keeps your white ink circulation system (WICS) working smoothly and prevents downtime.
Weekend Cleaning Protocols and Waste Ink Management
At least once a week, schedule a deeper cleaning session:
- Run an automated cleaning cycle to flush the ink lines and nozzles.
- Manually wipe down the printer carriage and rollers to clear any ink or powder buildup.
- Check and empty the waste ink pads or tanks to avoid overflow and unpleasant odors.
- Inspect the TPU adhesive powder application area and clean excess deposits.
Handling waste ink properly not only prolongs your Jinlong DTF printer’s life but also ensures consistent print quality throughout the week.
Holiday Mode Storage Instructions for Jinlong DTF Printer
If your printer will be idle for more than a few days, switch to holiday mode following these steps:
- Flush all ink from the printhead using the cleaning cycle to prevent drying.
- Remove or securely cover the PET film roll to avoid dust contamination.
- Store the printer in a climate-controlled room with stable temperature and humidity, as outlined in Phase 1.
- Turn off power but keep the USB and network cables unplugged for safety.
Following these daily and weekly maintenance tasks keeps your Jinlong desktop DTF printer running reliably, saving you time and money while producing vibrant and durable prints. For more details on sustaining printhead health and managing your workspace environment, check out our comprehensive desktop DTF maintenance guide.


