

Common DTF RIP Software Problems Fixed for Reliable Printing Success
Understanding DTF RIP Software Basics
If you’re diving into DTF printing, mastering your RIP software is a must. RIP — short for Raster Image Processor — is the powerhouse behind turning your design files into printer-ready instructions. In a DTF setup, the RIP handles several crucial tasks:
- Rasterizing: It converts your images into dots that printers can understand.
- Channeling white ink: Since white ink behaves differently, the RIP creates a separate channel just for it, ensuring your prints pop on dark fabrics.
- Applying profiles: It matches colors and ink density through ICC profiles, keeping prints consistent and vibrant.
Popular DTF RIP software options include AcroRIP, CADlink Digital Factory, ProRIP, and MainTop. Each has unique features, but the right choice can save you headaches with smoother workflows, better color accuracy, and fewer glitches.
Here’s a quick compatibility checklist to keep your setup solid:
- Printer model: Make sure your RIP supports your specific DTF printer.
- Operating system: Verify compatibility with your PC’s OS, especially after updates.
- Dongle/USB connection: Many RIPs rely on hardware dongles for licensing—ensure your USB ports recognize them without issues.
Picking the right RIP software tailored to your hardware and workflow not only boosts print quality but also reduces common DTF RIP software troubleshooting down the line.
Installation and Setup Issues with DTF RIP Software
Getting your DTF RIP software up and running can sometimes hit a few bumps. One common snag is the \”No dongle detected\” error or the software refusing to launch. Try swapping USB ports or reinstalling the dongle driver first. Temporarily disable your antivirus, as it might block the dongle connection. Also, double-check the dongle’s authenticity to make sure it’s not faulty or counterfeit.
If your printer isn’t recognized within the RIP software, the issue often lies in driver selection. Make sure you’re using the correct printer driver for your model. Try unplugging and reconnecting the USB cable, then follow a restart sequence: reboot your PC first, then power cycle your printer. This sequence helps re-establish communication between the devices.
Another headache comes after updating your OS or printer drivers—compatibility conflicts can pop up unexpectedly. Some RIP software like AcroRIP or CADlink Digital Factory may need updates themselves to work smoothly with the latest Windows updates. Keep an eye on official RIP software update guides to avoid these issues.
For a solid starting point with your DTF printer and RIP setup, check out our detailed DTF transfer printer complete guide for custom apparel printing to avoid common installation pitfalls.
Color and Output Quality Problems in DTF RIP Software
If your DTF prints come out with dull, faded, or mismatched colors, the first thing to check is your ICC profile calibration. Using the wrong or outdated ICC profiles can throw off color accuracy. Also, make sure your monitor is calibrated correctly to show true colors while you design. Remember to use the right color space—RGB for most DTF workflows works best, but some setups might demand CMYK depending on the RIP software. This helps prevent that frustrating RIP software color mismatch issue.
Banding, streaking, or grainy prints are another common headache in DTF printing. To fix these, increase your print resolution—1440×1440 dpi is a solid target. Check if your RIP software is using unidirectional vs. bidirectional printing; unidirectional usually gives cleaner results, though it might slow the process. Also, reducing the wave or print head pass settings can smooth out those lines and grain effects.
When it comes to white ink problems like insufficient underbase or translucent white areas, this usually ties back to your RIP settings for white ink. Boost the white ink density or channel to lay down a stronger underbase. Enabling a double white pass is a great way to solidify that base layer, especially on darker garments. Don’t forget to verify the underbase mask in your RIP to make sure white ink is only applied where it’s needed. Proper settings here can greatly reduce common DTF white ink underbase problems.
For more consistency, pairing your RIP setup with quality materials like Jinlong DTF Transfer Films helps maintain color vibrancy and improves the overall look of your prints. If you’re interested, check out how the Jinlong DTF transfer film supports excellent print quality and reduces color issues common in DTF setups.
Ink and Printhead-Related Errors Tied to RIP Settings
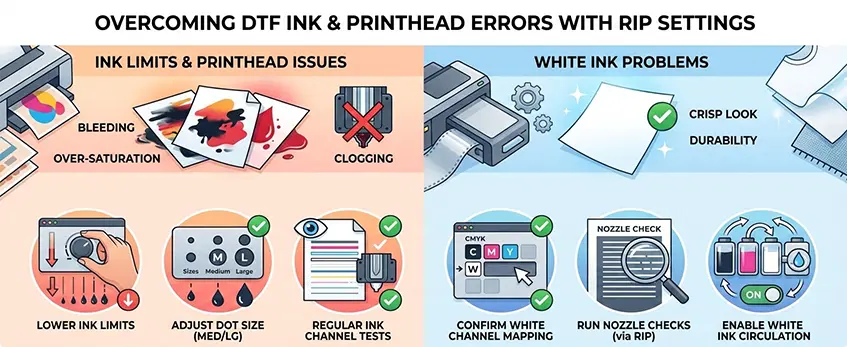
One of the most common DTF RIP software troubleshooting issues revolves around ink and printhead errors caused by incorrect RIP settings. Over-saturation can lead to smearing, bleeding, or even clogged nozzles, which ruins print quality and slows down production. To fix this:
- Lower ink limits in your RIP software settings to prevent excess ink from depositing.
- Adjust dot size to medium or large to balance ink flow without flooding the printhead.
- Test ink channels regularly via the RIP to catch any channel-specific problems early.
White ink gives DTF prints their crisp look and durability, but it’s often where RIP errors show up most. If white ink is printing incorrectly or not at all:
- Confirm that the white channel mapping is correct in the RIP setup—white ink must be assigned to the right channel.
- Run nozzle checks via the RIP software to identify clogs or dead nozzles affecting white ink flow.
- If your printer supports it, enable white ink circulation to keep the ink fresh and prevent settling or clogging.
Proper management of white ink issues is critical since it forms the base layer that helps colors pop on dark fabrics. For smooth, high-quality prints, consider how premium jinlong DTF inks and films can reduce RIP-related inconsistencies by ensuring consistent ink flow and better color profiles.
Performance and Processing Glitches in DTF RIP Software
Slow ripping or processing times, especially when the progress bar gets stuck at 99%, can be frustrating. Here’s what you can do to speed things up:
- Close unnecessary background apps to free up system resources.
- Ensure your computer meets the RIP software’s minimum system requirements—this includes enough RAM and a strong CPU.
- Optimize your file sizes by simplifying designs or reducing resolution without sacrificing quality.
- Keep your RIP software updated to benefit from performance improvements and bug fixes.
File errors like corrupted PDFs or unsupported formats are another common problem. To avoid these:
- Convert your designs into supported formats like PNG or TIFF before importing into the RIP software.
- Clear the RIP software cache and history regularly to prevent glitches.
- When using PDFs, make sure they are exported properly from your design software to avoid ripping errors.
By addressing these performance and processing glitches, you’ll save time and increase output reliability. For proven tips on maintaining smooth DTF printing from start to finish, check out our DTF color chart guide for accurate color matching to ensure your files are optimized for the best results.
Advanced Troubleshooting and Error Messages
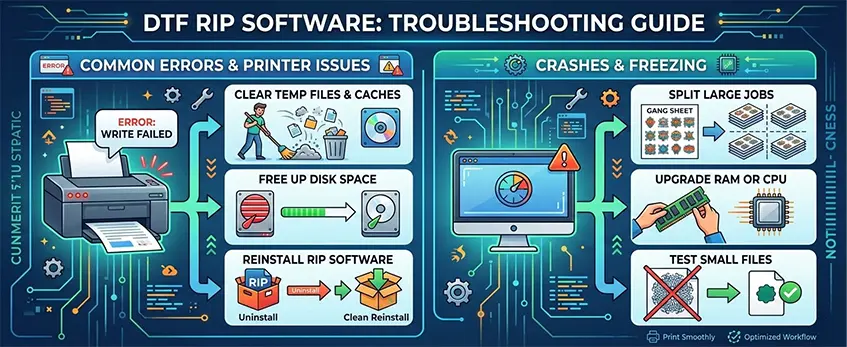
When working with DTF RIP software, you might run into specific error codes like \”File write failed\” or notice your printer showing red blinking lights. These issues often mean your system is struggling with file handling or communication errors. To fix these:
- Clear temp files and caches: Over time, leftover temporary data can clog your system. Use disk cleanup tools to remove them.
- Free up disk space: Low storage can cause RIP software to hang or fail during file writing.
- Reinstall the RIP software: Sometimes a clean reinstall fixes corrupted program files or driver conflicts.
If your RIP software frequently crashes or freezes, especially when processing large gang sheets:
- Split large jobs into smaller batches to reduce processing load.
- Upgrade your computer\’s RAM or CPU if it consistently struggles with big files.
- Test with smaller, simpler files to isolate whether job size or file complexity triggers the problem.
These fixes are essential for smooth DTF RIP software troubleshooting and can save you from costly downtimes. Keeping your system optimized prevents common CADlink Digital Factory issues and other popular RIP software errors.
Prevention and Best Practices for Smooth Operation
Keeping your DTF RIP software running smoothly starts with some simple habits and smart choices.
Regular software updates and backups: Always keep your RIP software up to date to avoid bugs and compatibility issues. Backing up your settings and profiles prevents headaches if you need to reinstall or switch systems.
Daily nozzle checks and maintenance: A quick daily nozzle check helps spot white ink clogging early and keeps your prints sharp. Routine cleaning extends your printhead’s life and prevents RIP-related errors linked to print quality.
Optimal setting templates for fabrics and films: Create and save RIP presets tailored for different materials like cotton, polyester, or blends. Using right templates cuts down on trial and error, saving time and reducing print errors.
How jinlong DTF inks and films reduce inconsistencies: Choosing quality consumables makes a difference. Jinlong DTF inks offer consistent flow and stable white ink density, minimizing common RIP challenges like underbase problems or uneven saturation. Their reliable color profiles also help fix RIP color mismatch issues. Check out their DTF transfer film 40cm double std series for consistent film performance.
When to contact support or consider alternatives: If you face persistent RIP dongle not detected errors, frequent crashes, or unsolvable color mismatches, don’t hesitate to reach out to your software support. Sometimes, switching to another DTF RIP software like AcroRIP or CADlink can be the best move to keep your production smooth.
Following these best practices not only prevents common DTF RIP software problems but also boosts your print quality and workflow efficiency.


