

DTF vs Heat Transfer Equipment Materials Workflow Explained
If you’re diving into the custom apparel world, chances are you’ve hit the classic crossroads: DTF vs Heat Transfer Vinyl. Both methods promise vibrant, durable prints, but the real question is—which one matches your gear, budget, and workflow? Whether you’re a small biz owner, hobbyist, or printer scaling up, understanding the equipment, materials, and step-by-step processes behind each is crucial. This guide cuts through the noise, spotlighting what you need to know about setup, costs, fabric compatibility, and print quality—powered by the trusted jinlong DTF system—so you can pick the best fit and avoid common pitfalls like wasted materials or weeding headaches. Ready to discover which transfer method will boost your apparel game in 2026? Let’s get started.
What Is DTF Printing?
DTF printing, or Direct to Film printing, is a modern apparel decoration technique where vibrant designs are printed onto a special PET film using CMYK plus white inks. This process then applies an adhesive powder to the printed film, cures it, and finally transfers the image onto fabric with a heat press. Unlike traditional methods, DTF allows for complex photos, gradients, and multi-color designs with sharp detail and bright, durable colors.
The key advantages of DTF printing for printers include:
- Full-color versatility: Handle intricate designs with unlimited colors and smooth gradients easily.
- Soft hand feel: Transfers remain flexible, comfortable to wear without the stiffness common in other methods.
- Fabric compatibility: Works well on a wide range of materials, including cotton, polyester, blends, and even dark or light fabrics.
- Production efficiency: Faster setup and fewer process steps than some alternatives, ideal for short runs and on-demand printing.
Common use cases for DTF printing include multi-color shirt designs, photographic prints with subtle shading, and any artwork requiring fine detail or vibrant colors. For printers seeking a balance between quality, durability, and workflow ease, DTF printing—especially leveraging trusted equipment like jinlong DTF printers—is an increasingly popular choice in the custom apparel market.
What Is Heat Transfer Vinyl (HTV)?
Heat Transfer Vinyl, or HTV, is a popular method for customizing apparel by cutting designs out of special vinyl sheets and then applying them with heat. The process involves using a vinyl cutter to shape your design, weeding away excess material, positioning the vinyl on your fabric, and pressing it with a heat press to bond the design permanently.
HTV comes in many variations to suit different style needs:
- Standard vinyl: Solid colors with a smooth finish, perfect for text and simple graphics.
- Glitter vinyl: Adds sparkle and shine, ideal for eye-catching accents.
- Flock vinyl: Offers a soft, fuzzy feel for a textured look.
- Holographic vinyl: Reflects light in rainbow colors, great for trendy designs.
- Printable HTV: Allows full-color printing before heat application, expanding design options.
This versatility makes HTV a favorite for simpler designs like single-color text, logos, or layered graphics. It’s especially common in athletic wear, promotional apparel, and small runs where bold, durable prints are needed without complicated full-color gradients.
With its straightforward cutting and pressing workflow, HTV is beginner-friendly yet profound enough to handle creative multi-layered designs, making it a staple in custom t-shirt printing and other fabric decoration techniques.
Head-to-Head Comparison: DTF vs HTV
Here’s a quick breakdown comparing Direct to Film (DTF) printing vs Heat Transfer Vinyl (HTV) across key factors to help you decide which method fits your needs best.
| Feature | DTF Printing | Heat Transfer Vinyl (HTV) |
|---|---|---|
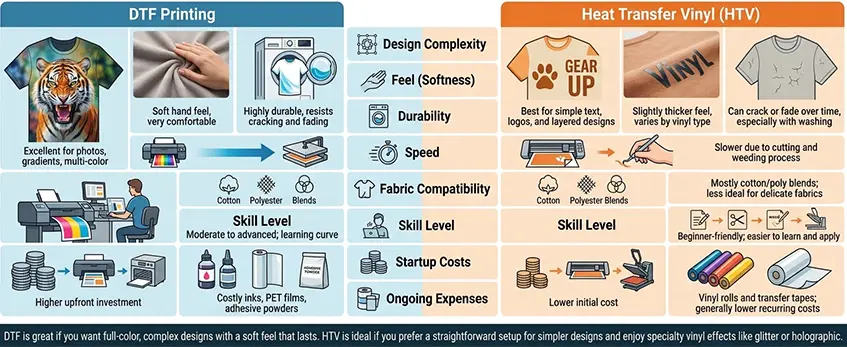
| Design Complexity | Excellent for photos, gradients, multi-color | Best for simple text, logos, and layered designs |
| Feel (Softness) | Soft hand feel, very comfortable | Slightly thicker feel, varies by vinyl type |
| Durability | Highly durable, resists cracking and fading | Can crack or fade over time, especially with washing |
| Speed | Faster for complex, full-color prints | Slower due to cutting and weeding process |
| Fabric Compatibility | Works on most fabrics including cotton, polyester, blends | Mostly cotton/poly blends; less ideal for delicate fabrics |
| Skill Level | Moderate to advanced; learning curve for printing and curing | Beginner-friendly; easier to learn and apply |
| Startup Costs | Higher upfront investment for printers and curing stations | Lower initial cost; mainly vinyl cutter and heat press |
| Ongoing Expenses | Costly inks, PET films, adhesive powders | Vinyl rolls and transfer tapes; generally lower recurring costs |
DTF is great if you want full-color, complex designs with a soft feel that lasts. HTV is ideal if you prefer a straightforward setup for simpler designs and enjoy specialty vinyl effects like glitter or holographic.
For a deeper understanding of the DTF process and equipment, check out this detailed DTF equipment and materials guide to plan your setup efficiently.
Equipment Breakdown: DTF vs HTV
When it comes to DTF vs heat transfer vinyl (HTV), knowing the equipment you’ll need is crucial for budget and workspace planning.
DTF Equipment Essentials
- DTF Printers: Specialized printers that handle CMYK + white inks for full-color prints.
- Powder Shaker: Applies adhesive powder evenly to the printed film.
- Curing Station: Used to cure the adhesive powder so it sticks during transfer.
- Heat Press: For transferring the design to fabric with precise temperature control.
- RIP Software: Manages print files and controls color profiles for accurate output.
- Accessories: Includes PET film rolls, powder containers, and trimming tools.
HTV Equipment Essentials
- Vinyl Cutters: Precise cutting machines to shape vinyl designs.
- Heat Press: Also needed for applying vinyl to fabrics.
- Weeding Tools: Small picks and tweezers to remove excess vinyl.
- Design Software: Programs that prepare and layer designs for cutting.
Shared Gear and Upgrades
Both methods share a heat press, but the rest of the equipment varies. DTF setups generally require more initial investment and space due to the printer and curing station. HTV gear is more compact and beginner-friendly but may need upgrades like better cutters or software for advanced designs.
Startup Costs and Space
- DTF: Higher startup costs due to the printer and curing equipment, plus workspace for drying/curing. Expect to allocate more room and budget, but it supports full-color, complex designs.
- HTV: Lower entry costs and a smaller footprint, ideal for simple text, logos, and basic layering projects.
For those stepping into DTF, considering details like the right film choice is important—check out this reliable DTF transfer film option for quality materials that match your equipment needs.
Balancing your equipment setup with your design goals and workspace is key when deciding between DTF and HTV.
Materials and Consumables: DTF vs HTV Essentials
When comparing DTF printing vs HTV, understanding the materials and consumables is key to choosing the best fit for your business or hobby.
DTF Materials
- PET Film: This clear film is the base for DTF prints, designed to accept the ink and adhesive powder.
- CMYK + White Inks: DTF uses a special ink set including bright white, enabling vibrant full-color prints on dark and light fabrics.
- Adhesive Powder: Applied after printing to stick the design to the garment. Quality adhesive, like TPU powder known for its durability and elasticity, makes a big difference (learn more about TPU powder properties).
- Compatible Blanks: Cotton, polyester, and blends work well, but fabric compatibility impacts final feel and wash performance.
HTV Materials
- Vinyl Rolls or Sheets: Available in standard colors and specialty finishes like glitter, flock, and holographic.
- Transfer Tape: Used to lift and position vinyl precisely on garments.
- Weeding Waste: The leftover vinyl that’s cut away after the design is transferred to the transfer tape.
Quality and Storage Tips
- For DTF, store PET films in a cool, dry place to avoid curling or dust contamination. Keep inks sealed to prevent drying out and use RIP software optimized for ink consumption and color accuracy (see how RIP software affects DTF printing).
- For HTV, protect vinyl from heat and moisture to prevent curling or adhesive failure. Store blades and weeding tools dry and clean to maintain precision.
Choosing quality materials and properly storing your DTF or HTV supplies ensures consistent, vibrant prints and minimizes waste, crucial for keeping costs down and productivity up.
Workflow Breakdown: Step-by-Step for DTF vs HTV
Understanding the workflow for both DTF printing and heat transfer vinyl (HTV) is crucial for efficiency and quality results.
DTF Workflow Steps
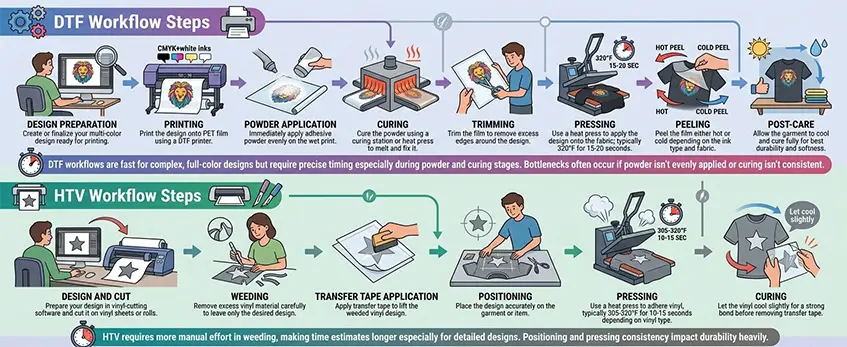
- Design preparation: Create or finalize your multi-color design ready for printing.
- Printing: Print the design onto PET film using a DTF printer with CMYK+white inks.
- Powder application: Immediately apply adhesive powder evenly on the wet print.
- Curing: Cure the powder using a curing station or heat press to melt and fix it.
- Trimming: Trim the film to remove excess edges around the design.
- Pressing: Use a heat press to apply the design onto the fabric; typically 320°F for 15-20 seconds.
- Peeling: Peel the film either hot or cold depending on the ink type and fabric.
- Post-care: Allow the garment to cool and cure fully for best durability and softness.
DTF workflows are fast for complex, full-color designs but require precise timing especially during powder and curing stages. Bottlenecks often occur if powder isn’t evenly applied or curing isn’t consistent.
HTV Workflow Steps
- Design and cut: Prepare your design in vinyl-cutting software and cut it on vinyl sheets or rolls.
- Weeding: Remove excess vinyl material carefully to leave only the desired design.
- Transfer tape application: Apply transfer tape to lift the weeded vinyl design.
- Positioning: Place the design accurately on the garment or item.
- Pressing: Use a heat press to adhere vinyl, typically 305-320°F for 10-15 seconds depending on vinyl type.
- Curing: Let the vinyl cool slightly for a strong bond before removing transfer tape.
HTV requires more manual effort in weeding, making time estimates longer especially for detailed designs. Positioning and pressing consistency impact durability heavily.
Time Estimates and Efficiency Tips
- DTF transfers typically take 10-20 minutes per garment depending on design size and drying times.
- HTV projects can range from 15 minutes to over 30 minutes, mainly due to weeding and transfer placement.
Efficiency tips:
- For DTF, ensure powder application and curing stations are well-maintained to prevent bottlenecks.
- For HTV, using quality weeding tools and pre-planning your cuts can save significant time.
- Invest in a reliable heat press that supports temperature consistency for both methods.
By understanding each step clearly, you can optimize your workspace and schedule for faster turnaround and higher output.
For more on gear and materials that streamline these processes, check out our in-depth DTF equipment and materials guide.
Pros and Cons of Each Method: DTF vs Heat Transfer Vinyl

When deciding between DTF printing vs heat transfer vinyl (HTV), knowing the strengths and drawbacks of each helps you pick what fits your needs best.
DTF Pros:
- Soft hand feel: Prints feel smooth and nearly part of the fabric, great for comfort.
- Unlimited colors: Perfect for photos, gradients, and complex multi-color designs without extra effort.
- Fast for complex designs: No need for layering or multiple cuts, speeding up production.
- Highly durable: Stands up well to washing and wear over time.
DTF Cons:
- Higher startup cost: Equipment like printers, powder shakers, curing stations, and specialized inks come with a price.
- Maintenance: Requires routine care, especially with printer heads and adhesive powder, to keep quality consistent.
HTV Pros:
- Low-cost entry: Vinyl cutters and heat presses are generally more affordable to start with.
- Beginner-friendly: The process is straightforward, making it ideal for newcomers.
- Specialty effects: Options like glitter, flock, holographic, and printable HTV add unique textures and looks.
HTV Cons:
- Time-consuming weeding: Complex or multi-layered designs require careful, often slow, weeding.
- Color limitations: Typically limited to solid colors or simple combinations unless layering multiple HTVs.
- Cracking risk: Over time, HTV can crack or peel, especially on stretchy or frequently washed fabrics.
When to Choose Which:
- Go DTF for vibrant, detailed prints in higher volumes where durability and a soft feel matter.
- Choose HTV if you\’re starting out with simpler designs, need specialty effects, or want a lower upfront investment.
Deciding between direct to film vs heat transfer vinyl ultimately depends on your budget, design needs, and production goals. For more on key equipment like the curing process and how white ink impacts DTF, check out our detailed insights on DTF printer with white ink vs CMYK only and tips on common problems with A3 DTF transfer film.
Which Method Should You Choose? Decision Guide
Choosing between DTF vs heat transfer vinyl (HTV) depends largely on your budget, volume, design needs, fabric types, skill level, and business goals. Here’s a quick guide to help:
| Factor | DTF Printing | Heat Transfer Vinyl (HTV) |
|---|---|---|
| Budget | Higher startup cost, lower cost for large runs | Low upfront costs, but materials add up over time |
| Volume | Ideal for medium to large batches | Best for small orders and one-offs |
| Designs | Complex, full-color, gradient works perfectly | Simple logos, text, layered colors |
| Fabric Types | Works on nearly all fabrics, including polyester blends | Best on cotton and polyester, limited blends |
| Skill Level | Intermediate to advanced needed | Beginner-friendly, easier learning curve |
| Business Growth | Scalable, fast production with less manual work | Slower scale, more hands-on with weeding |
Recommendations for Hobbyists vs Pros
- Hobbyists or small shops: HTV is a great starting point due to low startup costs and simple workflows. It’s perfect for basic designs and small runs without a big upfront investment.
- Growing businesses or pros: DTF offers more flexibility in design and speed, making it suitable for scaling and handling complex prints. Check out options like this best DTF transfer printer for t-shirt businesses to see what might fit your needs.
Hybrid Approach: Best of Both Worlds
Some businesses use a hybrid approach:
- Use HTV for simple, branded work like logos or name tags.
- Rely on DTF for full-color, photo-quality prints or complex designs.
This strategy balances cost and capability, letting you choose the right method based on order complexity.
Remember, aligning your choice with your specific product needs and customer expectations is key to success.
Maintenance, Troubleshooting, and Best Practices
Keeping your DTF and HTV equipment in top shape is key to smooth operations and quality prints. Here’s what you need to know:
Printer and Film Care for DTF
- Clean your printer regularly: This prevents clogging and keeps ink flow smooth. Wipe print heads and maintain the ink system as per manufacturer instructions.
- Proper storage of PET film: Store DTF transfer film in a cool, dry place to avoid moisture buildup, which can cause poor adhesion or bubbles during pressing.
- Use high-quality adhesive powder carefully: Avoid over or under-applying to prevent print issues. For powder handling tips and supplies, check trusted sources like this DTF transfer film guide.
- Keep curing stations clean to ensure even powder melting and optimal bonding.
- Watch for common issues like patchy prints, powder clumping, or peeling — these usually hint at maintenance or temperature setting adjustments.
Blade and Vinyl Storage for HTV
- Keep blades sharp and clean for precise cuts; dull blades cause ragged edges and waste material.
- Store vinyl rolls/sheets away from heat and direct sunlight to prevent warping or fading.
- Use airtight containers or bags to protect HTV sheets from dust and moisture.
- Regularly check your heat press for consistent temperature and pressure to avoid vinyl cracking or poor adhesion.
Common Issues and Fixes
| Issue | Likely Cause | Quick Fix |
|---|---|---|
| DTF peeling after pressing | Insufficient curing or powder | Adjust curing time, check powder use |
| Vinyl edges lifting (HTV) | Low heat or pressure | Increase heat/pressure settings |
| Colors dull or washed out | Old ink or improper storage | Replace inks, improve storage |
| Uneven print spots (DTF) | Film moisture or clogged heads | Dry film thoroughly, clean printer |
Safety and Environment Tips
- Work in a well-ventilated area, especially when curing DTF or pressing vinyl, as heat and powders can release fumes.
- Wear gloves when handling adhesive powders to avoid skin irritation.
- Dispose of vinyl scraps and spent films responsibly — recycling options may be limited but proper waste segregation helps.
- Keep your workstation clean to reduce dust contamination on prints.
Staying on top of maintenance and troubleshooting helps you get consistent, professional results whether you’re working with DTF printing vs heat transfer vinyl. For more detailed advice tailored to DTF, check out the DTF for beginners resource to keep your gear humming without hiccups.


